Blog
北极熊导航复现日志
An English translation is not available yet. The latest Simplified Chinese source is shown without triggering paid translation.
1.简介
介绍:https://bbs.robomaster.com/wiki/4577/714072?source=7
源码1:https://github.com/SMBU-PolarBear-Robotics-Team/pb2025_sentry_nav 源码2:https://github.com/SMBU-PolarBear-Robotics-Team/rmu_gazebo_simulator
Fork:https://github.com/tungchiahui/ysu2026_rm_sentry
2.运行方式
2.1.demo
colcon build --symlink-install --cmake-args -DCMAKE_BUILD_TYPE=Release# 导航
ros2 launch pb2025_nav_bringup rm_navigation_simulation_launch.py \
world:=rmuc_2025 \
slam:=False# 启动仿真
ros2 launch rmu_gazebo_simulator bringup_sim.launch.py2.2.YSU
克隆代码:
git clone https://github.com/tungchiahui/ysu2026_rm_sentry.git安装small_gicp:
sudo apt install -y libeigen3-dev libomp-dev

git clone https://github.com/koide3/small_gicp.git
cd small_gicp
mkdir build && cd build
cmake .. -DCMAKE_BUILD_TYPE=Release && make -j
sudo make install
安装xmacro和vcstool2:
sudo apt install python3-pip python3-vcstool
pip install xmacro
安装依赖:
cd ./ysu2026_rm_sentry

sudo apt update
rosdep install -r --from-paths src --ignore-src --rosdistro $ROS_DISTRO -y
colcon build --symlink-install3.功能包
3.1.ysu2026_robot_description
本功能包复制于pb2025_robot_description:
然后把packages.xml和cmakelists.txt里的pb2025_robot_description全部改成ysu2026_robot_description。
把/src/ysu2026_robot_description/xmacro/pb2025_sentry_robot.sdf.xmacro复制一份为/src/ysu2026_robot_description/xmacro/ysu2026_sentry_robot.sdf.xmacro。
随后删掉pb2025_infantry_robot.sdf.xmacro和pb2025_sentry_robot.sdf.xmacro。
3.1.1.扩展知识点
3.1.1.1.xmacro
- 变量基本完全对应
xacro
<xacro:property name="wheel_radius" value="0.076"/>

<cylinder radius="${wheel_radius}" length="0.03"/>
xmacro
<xmacro_define_value name="wheel_radius" value="0.076"/>

<cylinder>
    <radius>${wheel_radius}</radius>
    <length>0.03</length>
</cylinder>- 宏定义也几乎一一对应
xacro
<xacro:macro name="wheel" params="name radius width">
    <link name="${name}">
        ...
    </link>
</xacro:macro>
调用:
<xacro:wheel
    name="front_left_wheel"
    radius="0.076"
    width="0.03"
/>
xmacro
<xmacro_define_block
    name="wheel"
    params="name radius width">

    <link name="${name}">
        ...
    </link>

</xmacro_define_block>
调用:
<xmacro_block
    name="wheel"
    name_arg="front_left_wheel"
    radius="0.076"
    width="0.03"
/>- include
xacro
<xacro:include filename="wheel.xacro"/>xmacro
<xmacro_include uri="file://wheel.sdf.xmacro"/>在当前项目中还可以看到:
<xmacro_include
    uri="model://rm25_example_robot/rm25_example_robot.def.xmacro"
/>这里的model://是 sdformat_tools 针对 Gazebo / SDF 做的 URI 解析支持。
- ${} 表达式
xmacro 和 xacro 都支持类似:
${radius}以及数学表达式:
${2 * radius}例如:
<ixx>${m*(y*y+z*z)/12}</ixx>所以可以在宏参数中进行简单数学运算。
- 条件
xacro
<xacro:if value="${use_lidar}">
    ...
</xacro:if>
xmacro
xmacro 中通常可以通过宏调用的 condition 控制:
<xmacro_block
    name="lidar"
    condition="${use_lidar}"
    ...
/>
条件为真时展开这个宏,条件为假时不展开。
- .def.xmacro
例如:
rm25_example_robot.def.xmacro这里的.def并不是 xmacro 的特殊语法,只是一种文件命名习惯。
通常表示:这个文件主要负责定义宏。
类似:
xxx.def.xmacro
    ↓
定义机器人结构、link、joint 等宏
然后:
simulation_robot.sdf.xmacro
    ↓
include 前面的 def.xmacro
    ↓
调用其中定义的宏
    ↓
生成完整 SDF
例如以后可以写:
ysu2026_sentry_robot.def.xmacro里面定义:
<xmacro_define_block
    name="ysu2026_sentry_robot"
    params="chassis_height gimbal_yaw_height">

    ...

</xmacro_define_block>
然后在:
simulation_robot.sdf.xmacro中引入并调用:
<xmacro_include
    uri="model://ysu2026_sentry_robot/ysu2026_sentry_robot.def.xmacro"
/>

<xmacro_block
    name="ysu2026_sentry_robot"
    chassis_height="${chassis_height}"
    gimbal_yaw_height="${gimbal_yaw_height}"
/>
记忆:
xmacro_define_value
    ≈ xacro:property

xmacro_define_block
    ≈ xacro:macro

xmacro_block
    ≈ 调用 xacro macro

xmacro_include
    ≈ xacro:include

${...}
≈ ${...}3.1.2.总体框架
3.1.2.1.xmacro介绍
这个xmacro是本项目里自定义的一种格式,为了实现:
                  ┌→ SDF → Gazebo
.sdf.xmacro ──────┤
                  └→ SDF → URDF → robot_state_publisher
而之前学过的xacro+urdf,这个项目主要是xmacro+sdf。(对比着理解)
然后我们之前接触的都是
robot.urdf.xacro
      ↓
    xacro
      ↓
robot_description
      ↓
robot_state_publisher
      ↓
TF
而这个项目是:
simulation_robot.sdf.xmacro
          ↓
      xmacro4sdf
          ↓
         SDF
       ↙     ↘
   Gazebo    sdf2urdf
                 ↓
               URDF
                 ↓
      robot_state_publisher
                 ↓
TF| 功能 | xacro | xmacro |
|---|---|---|
| 定义变量 | <xacro:property name="r" value="0.1"/> |
<xmacro_define_value name="r" value="0.1"/> |
| 使用变量 | ${r} |
${r} |
| 数学表达式 | ${2 * r} |
${2 * r} |
| 定义宏 | <xacro:macro name="wheel" params="r w"> |
<xmacro_define_block name="wheel" params="r w"> |
| 调用宏 | <xacro:wheel r="..." w="..."/> |
<xmacro_block name="wheel" r="..." w="..."/> |
| include | <xacro:include filename="xxx.xacro"/> |
<xmacro_include uri="file://xxx.xmacro"/> |
| 条件 | <xacro:if value="${...}">...</xacro:if> |
主要通过 <xmacro_block ... condition="${...}"/> |
| namespace | xmlns:xacro=... |
不需要 |
| 参数默认值等高级功能 | 较丰富 | 简化很多 |
3.1.2.2.如何先建立自己的功能包和模型包
这个sdf.xmacro会被依赖去发布仿真里的模型和实物的tf关系。
这里是include了下面这个文件,所以要找这个文件。
<xmacro_include uri="model://rm25_example_robot/rm25_example_robot.def.xmacro" />他在/src/rmoss_gz_resources/resource/models/rm25_example_robot里,
你复制下这个大文件夹,并重命名为ysu2026_sentry_robot,里面的xmacro也命名为ysu2026_sentry_robot.def.xmacro。
这个文件里面需要修改的是:
<!--macro defination: rm25_example_robot-->
<xmacro_define_block
    name="rm25_example_robot"
    params="sticker_type chassis_height gimbal_pitch_height gimbal_yaw_height">
把这里的name改成
<!--macro definition: ysu2026_sentry_robot-->
<xmacro_define_block
    name="ysu2026_sentry_robot"
params="sticker_type chassis_height gimbal_pitch_height gimbal_yaw_height">接下来去修改同目录的model.sdf.xmacro:
    <!--include defination-->
    <xmacro_include uri="model://rm25_example_robot/rm25_example_robot.def.xmacro" />

    <!--rm25_example_robot model-->
    <model name="rm25_example_robot">
        <pose>0 0 0.15 0 0 0</pose>
<xmacro_block name="rm25_example_robot" sticker_type="${global_armor_sticker_type}" chassis_height="${chassis_height}" gimbal_yaw_height="${gimbal_yaw_height}" gimbal_pitch_height="${gimbal_pitch_height}"/>把上面rm25_example_robot全部改成ysu2026_sentry_robot。
    <!--include defination-->
    <xmacro_include uri="model://ysu2026_sentry_robot/ysu2026_sentry_robot.def.xmacro" />

    <!--ysu2026_sentry_robot model-->
    <model name="ysu2026_sentry_robot">
        <pose>0 0 0.15 0 0 0</pose>
<xmacro_block name="ysu2026_sentry_robot" sticker_type="${global_armor_sticker_type}" chassis_height="${chassis_height}" gimbal_yaw_height="${gimbal_yaw_height}" gimbal_pitch_height="${gimbal_pitch_height}"/>接下来去修改同目录的model.config:
<?xml version="1.0"?>
<model>
  <name>rmua19_standard_robot</name>
  <version>1.0</version>
  <sdf version="1.7">model.sdf</sdf>

  <author>
    <name>Lihan Chen</name>
    <email>lihanchen2004@163.com</email>
  </author>

  <description>
    The Basic Version of Standard Robot for RoboMaster University Series.
  </description>
</model>
修改成:
<?xml version="1.0"?>
<model>
  <name>ysu2026_sentry_robot</name>
  <version>1.0</version>
  <sdf version="1.7">model.sdf</sdf>

  <author>
    <name>Tung Chia-hui</name>
    <email>tungchiahui@gmail.com</email>
  </author>

  <description>
    Yanshan University RoboMaster 2026 Sentry Robot.
  </description>
</model>这里的model.sdf不需要手动改,这玩意是自动生成的:
model.sdf.xmacro
      ↓
xmacro4sdf
      ↓
model.sdf你可以看看model.sdf开头,明确说了这件事,而且不建议你直接修改:
<!-- =================================================================================== -->
<!-- |    This document was autogenerated by xmacro4sdf from model.sdf.xmacro          | -->
<!-- |    EDITING THIS FILE BY HAND IS NOT RECOMMENDED                                 | -->
<!-- =================================================================================== -->
所以以后真正维护的是:
关于模型:
ysu2026_sentry_robot.def.xmacro
model.sdf.xmacro

关于(这个不改问题也不大):
model.config回到/src/ysu2026_robot_description/resource/xmacro/ysu2026_sentry_robot.sdf.xmacro:
    <!--include defination-->
    <xmacro_include uri="model://rm25_example_robot/rm25_example_robot.def.xmacro" />

    <!--pb2025_sentry_robot model-->
    <model name="pb2025_sentry_robot">

        <pose>0 0 0.15 0 0 0</pose>
<xmacro_block name="rm25_example_robot" sticker_type="${global_armor_sticker_type}" chassis_height="${chassis_height}" gimbal_yaw_height="${gimbal_yaw_height}" gimbal_pitch_height="${gimbal_pitch_height}"/>把里面的rm25_example_robot和pb2025_sentry_robot全改成ysu2026_sentry_robot:
    <!--include defination-->
    <xmacro_include uri="model://ysu2026_sentry_robot/ysu2026_sentry_robot.def.xmacro" />

    <!--ysu2026_sentry_robot model-->
    <model name="ysu2026_sentry_robot">

        <pose>0 0 0.15 0 0 0</pose>
<xmacro_block name="ysu2026_sentry_robot" sticker_type="${global_armor_sticker_type}" chassis_height="${chassis_height}" gimbal_yaw_height="${gimbal_yaw_height}" gimbal_pitch_height="${gimbal_pitch_height}"/>至此上面这些在reality环境下已经正常了,但simulation还不行,打开同目录下的simulation_robot.sdf.xmacro:
    <!--include defination-->
    <xmacro_include uri="model://rm25_example_robot/rm25_example_robot.def.xmacro" />

    <!--simulation_robot model-->
    <model name="simulation_robot">

        <pose>0 0 0.15 0 0 0</pose>
        <xmacro_block name="rm25_example_robot" sticker_type="${global_armor_sticker_type}" chassis_height="${chassis_height}" gimbal_yaw_height="${gimbal_yaw_height}" gimbal_pitch_height="${gimbal_pitch_height}"/>
改成:
    <!--include defination-->
    <xmacro_include uri="model://ysu2026_sentry_robot/ysu2026_sentry_robot.def.xmacro" />

    <!--simulation_robot model-->
    <model name="simulation_robot">

        <pose>0 0 0.15 0 0 0</pose>
        <xmacro_block name="ysu2026_sentry_robot" sticker_type="${global_armor_sticker_type}" chassis_height="${chassis_height}" gimbal_yaw_height="${gimbal_yaw_height}" gimbal_pitch_height="${gimbal_pitch_height}"/>
至此,你就修改完了。
grep -R "rm25_example_robot" src/ysu2026_robot_description src/rmoss_gz_resources/resource/models/ysu2026_sentry_robot

grep -R "pb2025_sentry_robot" src/ysu2026_robot_description src/rmoss_gz_resources/resource/models/ysu2026_sentry_robot
正常应该是:
root@Desktop-Fedora:/home/tungchiahui/UserFolder/MySource/ysu2026_rm_sentry$ grep -R "rm25_example_robot" src/ysu2026_robot_description src/rmoss_gz_resources/resource/models/ysu2026_sentry_robot
src/rmoss_gz_resources/resource/models/ysu2026_sentry_robot/model.sdf:  <!--rm25_example_robot model-->
src/rmoss_gz_resources/resource/models/ysu2026_sentry_robot/model.sdf:  <model name="rm25_example_robot">
root@Desktop-Fedora:/home/tungchiahui/UserFolder/MySource/ysu2026_rm_sentry$ grep -R "pb2025_sentry_robot" src/ysu2026_robot_description src/rmoss_gz_resources/resource/models/ysu2026_sentry_robot只有model.sdf里还有残留:
找到这个脚本:/src/rmoss_gz_resources/update_model.sh
#!/bin/bash
path=`pwd`
for dir in $path/models/*; do
    echo "parse "$dir
    cd $dir
    tempfile=`mktemp temp.XXXXXX`
    xmacro4sdf model.sdf.xmacro > $tempfile
    lines_num=`cat $tempfile | wc -l`
    if (($lines_num > 3 )) ;then
        cat $tempfile > model.sdf
    else
        cat $tempfile
    fi
    rm -f temp.*
done
修改为:
#!/bin/bash

SCRIPT_DIR="$(cd "$(dirname "${BASH_SOURCE[0]}")" && pwd)"
MODEL_DIR="$SCRIPT_DIR/resource/models"

# 让 xmacro4sdf 能解析 model://xxx/...
export IGN_GAZEBO_RESOURCE_PATH="$MODEL_DIR:${IGN_GAZEBO_RESOURCE_PATH:-}"
export GAZEBO_MODEL_PATH="$MODEL_DIR:${GAZEBO_MODEL_PATH:-}"

for dir in "$MODEL_DIR"/*; do
    [ -d "$dir" ] || continue
    [ -f "$dir/model.sdf.xmacro" ] || continue

    echo "parse $dir"

    cd "$dir" || exit 1

    tempfile=$(mktemp temp.XXXXXX)

    if xmacro4sdf model.sdf.xmacro > "$tempfile"; then
        lines_num=$(wc -l < "$tempfile")

        if (( lines_num > 3 )); then
            cat "$tempfile" > model.sdf
            echo "generated: $dir/model.sdf"
        else
            echo "ERROR: generated content too short"
            cat "$tempfile"
        fi
    else
        echo "ERROR: xmacro4sdf failed: $dir"
    fi

    rm -f "$tempfile"
done
执行:
chmod +x ./src/rmoss_gz_resources/update_model.sh
./src/rmoss_gz_resources/update_model.sh
生成完后,返回ws目录:
grep -R "rm25_example_robot" src/ysu2026_robot_description src/rmoss_gz_resources/resource/models/ysu2026_sentry_robot会发现也没有输出了。
3.1.2.3.修改机器人参数
主要是机器人的底盘长宽、轮距/轴距、轮径、云台高度、Mid360 安装位置:
1. 底盘长宽高 / collision
2. 四个轮子的位置
3. 轮子半径
4. chassis_height
5. gimbal_yaw_height
6. gimbal_pitch_height
7. Mid360 的 parent 和 pose
首先你得知道ROS默认规定的方向:
+x:车头方向
+y:车体左侧
+z:竖直向上
而且北极熊现在的模型里,base_footprint 在地面,chassis 原点基本位于四个轮子的轮轴中心高度。
| 参数 | 你实际应该量什么 | 当前代码含义 |
|---|---|---|
| 底盘长度 | 车体刚性主体前沿到后沿,沿 X | geometry_box x=... |
| 底盘宽度 | 车体刚性主体左沿到右沿,沿 Y | geometry_box y=... |
| 底盘高度 | 刚性主体底面到顶面,沿 Z | geometry_box z=... |
| 轴距 | 前轮轴心到后轮轴心的 X 向距离 | x_front - x_rear |
| 轮距 | 左轮中心面到右轮中心面的 Y 向距离 | y_left - y_right |
| 轮径 | 轮子外圆直径 | 当前 2 × 0.0758 |
chassis_height |
地面 → chassis 坐标系原点 |
当前 0.076 m |
gimbal_yaw_height |
chassis 原点 → 云台 yaw 旋转轴原点 |
当前 0.1376 m |
gimbal_pitch_height |
yaw 轴原点 → pitch 轴原点 | 当前 0.16 m |
Mid360 pose |
parent 坐标系原点 → front_mid360 原点 |
当前相对 chassis |
打开/src/ysu2026_robot_description/resource/xmacro/ysu2026_sentry_robot.sdf.xmacro
主要修改下面几个:
- 底盘长度和底盘宽度
底盘长宽和轴距/轮距不是一个东西
比如现在北极熊:
        <!--chassis-->
        <link name="chassis">
            <inertial>
                <pose>0 0 0.055 0 0 0</pose>
                <xmacro_block name="inertia_box" m="15.0" x="0.36" y="0.24" z="0.13"/>
底盘 collision:
长度 x = 0.36
宽度 y = 0.24
但:
轴距 = 0.414
轮距 = 0.388
所以以后你可能得到:
底盘主体:
长 360 mm
宽 300 mm

轮中心:
轴距 420 mm
轮距 390 mm- 底盘高度
这个参数如其字面意思一样,就是底盘的厚度,也就是底盘的上顶面到下底面的距离。
- 轴距和轮距也要量“轮中心”,不是底盘外壳
北极熊的是:
找到/src/rmoss_gz_resources/resource/models/ysu2026_sentry_robot:
        <!--front_left wheel link and joint-->
        <xmacro_block name="chassis_wheel_l" prefix="front_left" parent="chassis" pose="0.207 0.194 0 0 0 0"/>
        <!--front_right wheel link and joint-->
        <xmacro_block name="chassis_wheel_r" prefix="front_right" parent="chassis" pose="0.207 -0.194 0 0 0 0"/>
        <!--rear_left wheel link and joint-->
        <xmacro_block name="chassis_wheel_r" prefix="rear_left" parent="chassis" pose="-0.207 0.194 0 0 0 0"/>
        <!--rear_right wheel link and joint-->
        <xmacro_block name="chassis_wheel_l" prefix="rear_right" parent="chassis" pose="-0.207 -0.194 0 0 0 0"/>
FL: 0.207 0.194
FR: 0.207 -0.194
RL: -0.207 0.194
RR: -0.207 -0.194那么轴距是 = 0.207 - (-0.207) = 0.414 m
那么轮距是 = 0.194 - (-0.194) = 0.388 m
示意图:
                 +X 前

       FL ●────────────● FR
          │            │
          │            │
          │            │
          │            │
       RL ●────────────● RR

          ←  轮距  →

前后两个轮轴中心的距离
        = 轴距
所以要测量的数据是: 前左轮中心 到 后左轮中心:X 方向距离 左轮中心面 到 右轮中心面:Y 方向距离 不是量轮胎最外侧。
- 轮径
这是轮子的直径,不是半径,注意下。
- 底盘距离水平地面的高度chassis_height:
    <!-- 底盘距离水平地面的高度 -->
    <xmacro_define_value name="chassis_height" value="0.077" />
    <!-- gimbal_yaw 相对于底盘的 z 轴安装偏移 -->
    <xmacro_define_value name="gimbal_yaw_height" value="0.026" />
    <!-- gimbal_pitch 相对于 gimbal_yaw 的高度差 -->
<xmacro_define_value name="gimbal_pitch_height" value="0.355" />这里的几个参数,这里的chassis_height所描述的是:
<joint name="base_to_chassis" type="fixed">
    <pose>0 0 ${chassis_height} 0 0 0</pose>
    <parent>base_footprint</parent>
    <child>chassis</child>
</joint>
由于四个轮子的 joint 都是:
parent="chassis"
pose="... ... 0 0 0 0"
所以结构其实是:
          chassis 原点
               ●──────── 轮轴中心(一般来讲是底盘原点,正好这个是轮轴中心重合了)
               │
               │ chassis_height
               │
地面 ──────────●──────────
base_footprint- 云台高度gimbal_yaw_height
<pose relative_to='chassis'>
    0 0 ${gimbal_yaw_height} 0 0 0
</pose>
他描述的是
chassis 坐标系原点
        │
        │ gimbal_yaw_height
        │
        ▼
云台 yaw 旋转轴原点
也就是chassis 坐标系原点到 yaw 旋转轴中心的 Z 向距离。
如果云台相对于底盘有前后偏移,那么不能只填gimbal_yaw_height,应该填完整的pose。
- 云台高度gimbal_pitch_height
也就是 yaw 旋转轴中心 → pitch 旋转轴中心的垂直距离。
                    ● pitch 旋转轴
                    │
                    │ gimbal_pitch_height
                    │
                    ● yaw 旋转轴
                    │
                    │ gimbal_yaw_height
                    │
                    ● chassis 原点
                    │
                    │ chassis_height
                    │
────────────────────● 地面-
mid360
- mid360的原点:
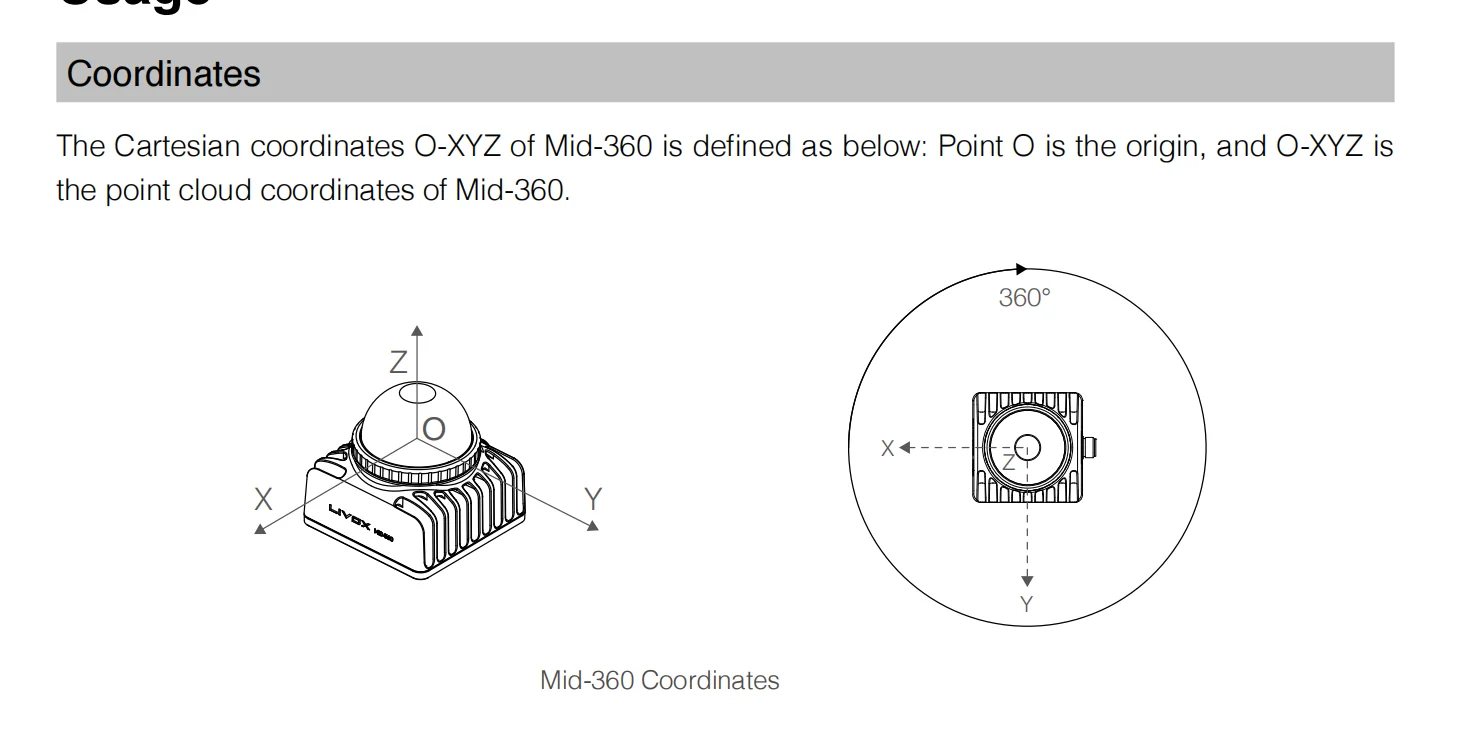
规定的方向:
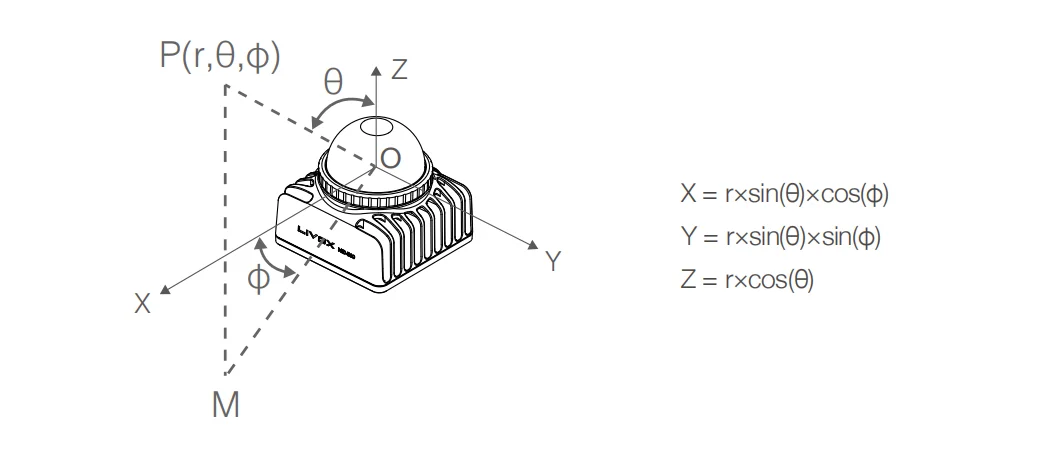
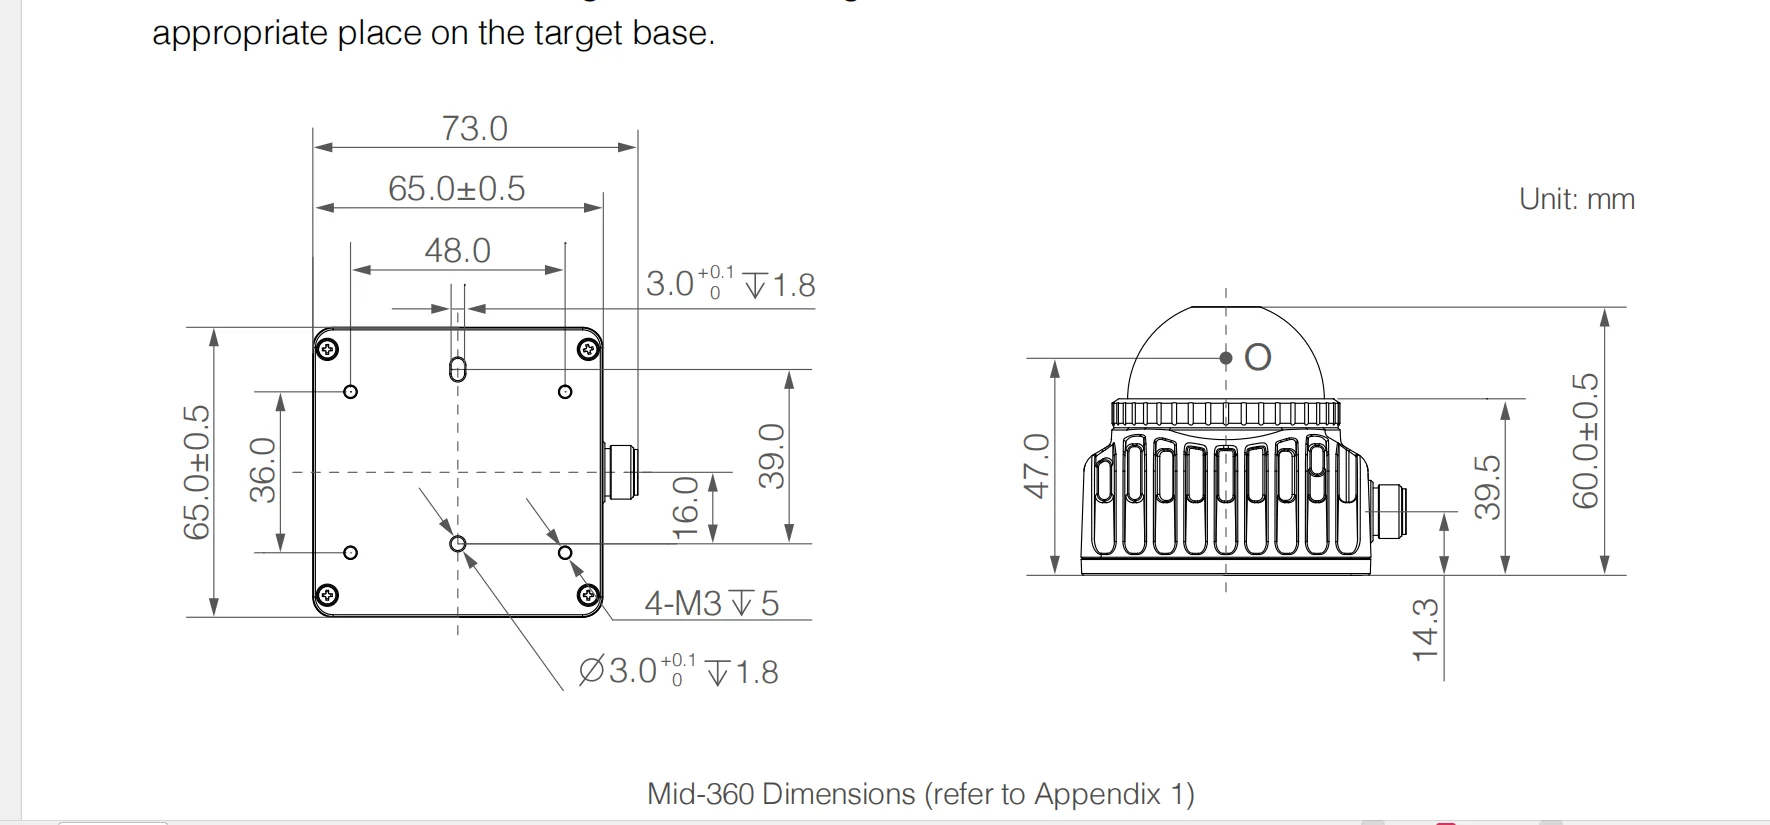
如上图可知,位于激光雷达的中心轴上,并距离底面47mm处。
也就是
底部安装面中心
    │
    │ +47 mm
    ↓
   O 点
先量 chassis / 云台坐标原点 到 Mid360 底部安装面中心的位置,然后 Z 再补这 47 mm,就能得到 chassis / 云台 → Mid360 官方 O 点的位置。
官方说明:
官方手册明确规定:Mid-360 的 O-XYZ 是点云坐标系,其中 O 是点云原点。
而内置 IMU 芯片相对于这个点云坐标系的位置是:
x = +11.00 mm
y = +23.29 mm
z = -44.12 mm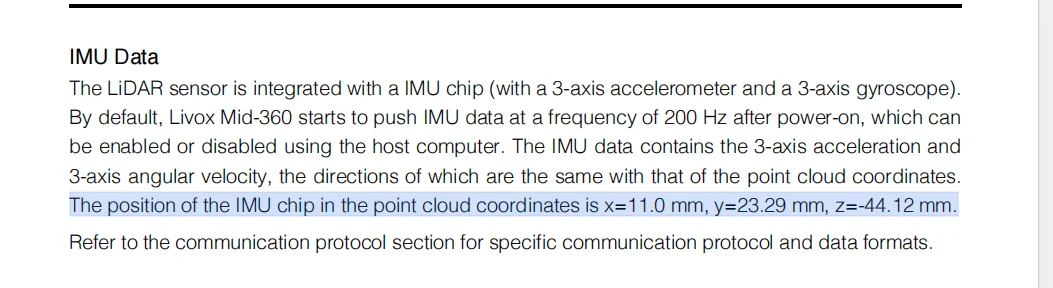
front_mid360 = LiDAR 点云 O 点
        ●
        │
        │  (+11, +23.29, -44.12) mm
        │
        ● IMU 芯片原点
这里先提前说明下``front_mid360`就是雷达的O_XYZ原点,具体怎么推出来的,请往下看。
- mid360的pose
<!--livox--> <xmacro_block name="livox" prefix="front_" parent="chassis" pose="0.16 0.0 0.18 ${pi/6} 0.0 ${pi/2}" ... />- 这个 pose 是 : chassis 坐标系 → front_mid360 坐标系
- 按北极熊这个来,是严格相对于 chassis 原点。
- 他的雷达是装在底盘上的,所以
parent="chassis",如果雷达要装在云台,就改成parent="gimbal_yaw",那么偏移也会变成相对于gimbal_yaw坐标系的偏移。.
x = +0.16 m
y =  0
z = +0.18 m
意思是 Mid360 O原点相对于 chassis 原点:
向前 160 mm
左右不偏
向上 180 mm
他这里pose的后三个参数是RPY,也就是相对于chassis 原点的偏移:
roll  = π/6 = 30°
pitch = 0°
yaw   = π/2 = 90°
另外你在 Mid360 model 里还会看到:
<visual>
    <pose>0 0 0 0 0 ${pi}</pose>
这个只是外观 mesh 转了 180°,不等于雷达传感器 frame 转了 180°。不要拿这个来算 TF。
- mid360到底量它外壳哪个点?
这里还要再精确一层。 北极熊当前 Mid360 模型内部是:
<joint ...>
    <child>${prefix}mid360</child>
</joint>

<link name="${prefix}mid360">
这里的
${prefix}mid360会被解析为front_mid360:这个
front_mid360一直很懵逼,他到底是什么? 他在readme里写的仿真里是简化的,所以不要在仿真里反推这个坐标系的原点到底是什么? 在reality的Point LIO里你可以看到extrinsic_T: [-0.011, -0.02329, 0.04412],这正是官方IMU的偏移。 而frame_id = front_mid360,所以说,反推出来front_mid360是我们点云的坐标系,也就是O_XYZ.而北极熊的 LiDAR 光学/扫描传感器实际上还额外:
<sensor name="${prefix}mid360_lidar" ...>
<pose>0 0 0.03 0 0 0</pose>
front_mid360 link 原点 │ │ +30 mm ▼ LiDAR 扫描原点而 IMU:
<sensor name="${prefix}mid360_imu" type="imu">没有额外 pose,所以当前仿真里基本相当于:IMU 原点 = front_mid360 原点
- mid360最后各个数据究竟填什么?
front_mid360为mid360的O_XYZ的原点。那么Mid360官方点云原点就和O_XYZ原点重合。 那么Mid360官方IMU原点就和O_XYZ有(+11, +23.29, -44.12)mm的偏移量。(但这里没必要给pose,在point_lio里给pose即可)
所以
<!-- chassis -> Mid360 官方点云 O -->
<xmacro_block
    name="livox"
    prefix="front_"
    parent="chassis"
    pose="实际 x 实际 y 实际 z 实际 roll 实际 pitch 实际 yaw"
/>
然后 Mid360 仿真内部:
<sensor name="${prefix}mid360_lidar" type="gpu_lidar">
<pose>0 0 0 0 0 0</pose>
而IMU这边,北极熊的方案我看懂了,虽然他让IMU坐标系与点云坐标系直接重合,并且仿真里也是重合的。 而在reality里,他是
extrinsic_T: [-0.011, -0.02329, 0.04412],这里明显是已经考虑到了这个偏移,所以我们没必要修改IMU的坐标系偏移。
综上,你应该需要的数据是:
1. 轮子实际直径

2. 前后轮中心轴距
   前轮中心 → 后轮中心

3. 左右轮中心轮距
   左轮中心面 → 右轮中心面

4. chassis 刚性主体:
   X 方向长度
   Y 方向宽度
   Z 方向高度

5. chassis/轮轴中心 → 云台 yaw 旋转轴中心:
   Δx
   Δy
   Δz

   如果云台不在底盘正中央,x/y 也得知道。

6. yaw 旋转轴中心 → 云台 pitch 旋转轴中心:
   Δx
   Δy
   Δz

7. Mid360 如果挂 chassis:
   chassis 原点 → Mid360 reference frame(mid360的原点:距离底面中心高47mm处)
   Δx Δy Δz
   roll pitch yaw

   如果挂 gimbal_yaw:
   yaw 轴原点 → Mid360 reference frame(mid360的原点:距离底面中心高47mm处)
   Δx Δy Δz
roll pitch yaw3.2.把各种功能包里的launch全部修改了
修改launch重定向到咱们的模型,主要先看下面的launch:
-
pb2025_nav_bringup里的rm_navigation_simulation_launch.py- 同功能包下的
robot_state_publisher_launch.py
- 同功能包下的
-
rmu_gazebo_simulator里的bringup_sim.launch.py- 同功能包下的
spawn_robots.launch.py - 同功能包下的
package.xml
- 同功能包下的
-
ysu2026_robot_description里的robot_description_launch.py
3.2.1.robot_state_publisher_launch.py:
    pkg_pb2025_robot_description_dir = get_package_share_directory(
        "pb2025_robot_description"
    )

    declare_robot_name_cmd = DeclareLaunchArgument(
        "robot_name",
        default_value="pb2025_sentry_robot",
        description="The file name of the robot xmacro to be used",
    )
改成
    pkg_robot_description_dir = get_package_share_directory(
        "ysu2026_robot_description"
    )

    declare_robot_name_cmd = DeclareLaunchArgument(
        "robot_name",
        default_value="ysu2026_sentry_robot",
        description="The file name of the robot xmacro to be used",
)3.2.2.spawn_robots.launch.py:
    pkg_pb2025_robot_description = get_package_share_directory(
        "pb2025_robot_description"
    )

    robot_xmacro_path = os.path.join(
        pkg_pb2025_robot_description,
        "resource",
        "xmacro",
        "simulation_robot.sdf.xmacro",
    )
改成:
    pkg_robot_description = get_package_share_directory(
        "ysu2026_robot_description"
    )

    robot_xmacro_path = os.path.join(
        pkg_robot_description,
        "resource",
        "xmacro",
        "simulation_robot.sdf.xmacro",
)3.2.3.robot_description_launch.py:
def generate_launch_description():
    # Get the launch directory
    bringup_dir = get_package_share_directory("pb2025_robot_description")
改成
def generate_launch_description():
    # Get the launch directory
bringup_dir = get_package_share_directory("ysu2026_robot_description")3.2.4.rmu_gazebo_simulator里的package.xml
<depend>pb2025_robot_description</depend>改成
<depend>ysu2026_robot_description</depend>3.2.5.测试
rm -rf build install log
colcon build --symlink-install
source install/setup.bash
ros2 launch rmu_gazebo_simulator bringup_sim.launch.pysource install/setup.bash
ros2 launch pb2025_nav_bringup rm_navigation_simulation_launch.py \
world:=rmuc_2025 \
slam:=False测试下Gazebo加载模型还正常不,如果正常则说明没毛病。
至此全部结束。
3.3.ysu2026_robot_description修改掉mid360的位置
北极熊的雷达是放在底盘上的,我们准备放到Yaw云台上。
        <!--livox-->
        <xmacro_block name="livox" prefix="front_" parent="chassis" pose="0.0496 0.0936 0.435 -${pi/12} 0 0" update_rate="20" samples="1875"/>
这代表:
chassis
└── front_mid360只需要改掉parent="chassis"即可。
我们想要的TF链是:
chassis
  │
  │ gimbal_yaw_odom_joint = joint_yaw
  ▼
gimbal_yaw_odom
  │
  │ fixed
  ▼
gimbal_pitch_odom
  │
  │ gimbal_yaw_joint = 0
  ▼
gimbal_yaw
  │
  │ gimbal_pitch_joint = joint_pitch
  ▼
gimbal_pitch如果没有什么大Yaw小Yaw云台,那么挂在gimbal_yaw_odom和gimbal_yaw没有任何区别,都不会影响导航。
但是,由于没有什么大Yaw小Yaw云台,然后还要根据robot_description发布静态TF,所以肯定是挂在gimbal_yaw_odom更加合理。
(但如果gimbal_yaw_odom和gimbal_yaw重合,那其实挂在哪都一样)
chassis
  │
  │ joint_yaw
  ▼
gimbal_yaw_odom
  ├── front_mid360
  │
  └── ...
<!--livox-->
<xmacro_block name="livox" prefix="front_" parent="gimbal_yaw_odom" pose="0.0496 0.0936 0.435 -${pi/12} 0 0" update_rate="20" samples="1875"/>3.4.Serial_Comm
https://github.com/tungchiahui/Serial_Pack
可以参考串口驱动与串口包协议
3.5.Joy
可以参考Joy
然后搞两个launch.py。
一个joy_controller.launch.py是用来发/cmd_vel的。(实车用的是这个)
一个joy_controller_sim.launch.py是用来发/red_standard_robot1/cmd_vel的。(仿真用的是这个)
3.6.MCU到Linux的数据
3.6.1.总概
chassis
  │
  ├─ gimbal_yaw_odom_joint      绕 Z,可动
  ▼
gimbal_yaw_odom
  │
  ├─ gimbal_pitch_odom_joint    fixed
  ▼
gimbal_pitch_odom
  │
  ├─ gimbal_yaw_joint           绕 Z,可动
  ▼
gimbal_yaw
  │
  ├─ gimbal_pitch_joint         绕 Y,可动
  ▼
gimbal_pitch
北极熊官方导航 README 明确把实车串口提供的关节称为:
gimbal_yaw_odom   = 大 yaw
gimbal_yaw        = 小 yaw
gimbal_pitch      = pitch
gimbal_pitch_odom_joint:可以认为就是 0,因为你现在的 description 里它本来就是 fixed。 gimbal_yaw_odom_joint:上电那一刻可以是 0,但运行时不能固定为 0,前提是咱们有北极熊同样的“大 yaw”机构。它应该跟着大 yaw 的真实角度更新。
| joint | 当前模型类型 | 北极熊代码里填的数据 | 可以理解成 |
|---|---|---|---|
gimbal_yaw_odom_joint |
revolute | ReceiveJointState.yaw |
云台/IMU 的参考 yaw 相对 chassis |
gimbal_pitch_odom_joint |
fixed | ReceiveJointState.pitch |
参考 pitch 层,但当前模型实际上固定 |
gimbal_yaw_joint |
revolute | IMU yaw |
IMU 相对于参考姿态的 yaw |
gimbal_pitch_joint |
revolute | IMU pitch |
IMU 相对于参考姿态的 pitch |
北极熊官方 standard_robot_pp_ros2 实际上有两类 MCU→Linux 数据。
第一类是 IMU 数据:
yaw,pitch,roll然后Linux 收到以后,发布 sensor_msgs/msg/Imu。
但其实这个数据没啥用,北极熊并没在导航里用到roll,rpy_vel这些数据。
imu_state

roll       rad
pitch      rad
yaw        rad

roll_vel   rad/s
pitch_vel  rad/s
yaw_vel    rad/s
然后 pitch → gimbal_pitch_joint yaw → gimbal_yaw_joint
第二类是 JointState/云台参考位置数据:
这个很重要
joint_state

pitch_odom   rad
yaw_odom     rad
Linux 收到以后并不马上发布,而是保存:
last_gimbal_pitch_odom_joint_ = pitch_odom;
last_gimbal_yaw_odom_joint_   = yaw_odom;
下一次 IMU 数据到来时,北极熊一次发布完整四项:
joint_msg.name = {
    "gimbal_pitch_joint",
    "gimbal_yaw_joint",
    "gimbal_pitch_odom_joint",
    "gimbal_yaw_odom_joint",
};

joint_msg.position = {
    imu_pitch,
    imu_yaw,
    pitch_odom,
    yaw_odom,
};
但是咱们没有大小yaw结构的话:
但为了尽量不改北极熊后面的 TF / Nav2 框架,最合适的兼容方法是:
你们真实 yaw
    ↓
gimbal_yaw_odom_joint

不存在的小 yaw
    ↓
gimbal_yaw_joint = 0

你们真实 pitch
    ↓
gimbal_pitch_joint
chassis
│
│ gimbal_yaw_odom_joint = 实际 yaw(大yaw)
▼
gimbal_yaw_odom
│
│ gimbal_pitch_odom_joint = fixed
▼
gimbal_pitch_odom
│
│ gimbal_yaw_joint = 0 (不存在小yaw)
▼
gimbal_yaw
│
│ gimbal_pitch_joint = 实际 pitch
▼
gimbal_pitch msg_jointstate.name = {
"gimbal_pitch_joint", // 小pitch
"gimbal_yaw_joint", //小yaw
"gimbal_pitch_odom_joint", //fixed
"gimbal_yaw_odom_joint" //大yaw
};
msg_jointstate.position = {
pitch, // 真实 pitch
0.0, // 不存在的小 yaw
0.0, // fixed
yaw // 真实 yaw
};chassis
│
│ gimbal_yaw_odom_joint ← 大 yaw,动态
▼
gimbal_yaw_odom
│
│ gimbal_pitch_odom_joint ← fixed
▼
gimbal_pitch_odom
│
│ gimbal_yaw_joint ← 小 yaw,动态
▼
gimbal_yaw
│
│ gimbal_pitch_joint ← pitch,动态
▼
gimbal_pitch最后 chassis → gimbal_yaw 依然完全正确。
综上,咱们正真需要的是:
MCU → Linux

roll       rad
pitch      rad
yaw        rad
joint_yaw  rad
joint_pitch rad
其中云台 IMU 的 RPY 用来生成 /serial/imu 的 orientation。
云台电机返回的角度用来joint_yaw和joint_pitch。
但其实,如果你的雷达放在Yaw的云台上,其实joint_pitch无所谓,不影响最终的导航,但可能和自瞄有关系。
查看sensor_msgs/msg/JointState:
ros2 interface show sensor_msgs/msg/JointState# This is a message that holds data to describe the state of a set of torque controlled joints.
#
# The state of each joint (revolute or prismatic) is defined by:
# * the position of the joint (rad or m),
# * the velocity of the joint (rad/s or m/s) and
# * the effort that is applied in the joint (Nm or N).
#
# Each joint is uniquely identified by its name
# The header specifies the time at which the joint states were recorded. All the joint states
# in one message have to be recorded at the same time.
#
# This message consists of a multiple arrays, one for each part of the joint state.
# The goal is to make each of the fields optional. When e.g. your joints have no
# effort associated with them, you can leave the effort array empty.
#
# All arrays in this message should have the same size, or be empty.
# This is the only way to uniquely associate the joint name with the correct
# states.
std_msgs/Header header
builtin_interfaces/Time stamp
int32 sec
uint32 nanosec
string frame_id
string[] name
float64[] position
float64[] velocity
float64[] effort