Wiki
其他操作
An English translation is not available yet. The latest Simplified Chinese source is shown without triggering paid translation.
1.工控机如何连wifi
当我们工控机从一个环境移动到另一个环境,且新的环境的wifi我们没有连接过,我们没有屏幕如何让工控机连上网呢?
进入工控机的硬盘目录,进入/etc/netplan/,底下有很多yaml,找到一个最符合下方格式的yaml:
network:
  version: 2
  wifis:
    NM-6f414fe0-2658-48ff-89ee-c7981b87bc96:
      renderer: NetworkManager
      match:
        name: "wlan0"
      dhcp4: true
      dhcp6: true
      access-points:
        "EMIS_Vinci_Robocon_5G":
          auth:
            key-management: "psk"
            password: "vinci666"
          networkmanager:
            uuid: "6f414fe0-2658-48ff-89ee-c7981b87bc96"
            name: "EMIS_Vinci_Robocon_5G"
            passthrough:
              wifi-security.auth-alg: "open"
              ipv6.addr-gen-mode: "default"
              ipv6.ip6-privacy: "-1"
              proxy._: ""
      networkmanager:
        uuid: "6f414fe0-2658-48ff-89ee-c7981b87bc96"
        name: "EMIS_Vinci_Robocon_5G"
将其改为新wifi的名和密码:
network:
  version: 2
  wifis:
    wlan0:
      dhcp4: true
      dhcp6: true
      access-points:
        "EMIS_Vinci_Robocon_5G":
          password: "vinci666"
工控机开机即可连上网。
2.SSH远程开发
2.1.环境准备
1.硬件准备
首先要有一台工控机(X86小型电脑,专业工控机,树莓派等等)。
控制系统的硬件载体是具有多样性的,常用的多是基于ARM、x86等架构的处理器,比如:PC、工控机、树莓派、NVIDIA Jetson...。不同的处理器都存在一定的优缺点,PC和工控机,处理器性能强大,但是功耗高、体积大、灵活性差,嵌入式系统则反之。对于我们而言,可以根据机器人平台的电气、载重、空间以及用途等诸多要素自主选择合适的控制系统。
无论选用何种处理器,只要是要进行机器人的开发,安装了ROS或者ROS2,那么对于开发人员而言,在使用上,没有任何本质的区别,或者换言之,作为软件工程师,部分场景下无需关注于硬件的选型。
2.设置固定IP
远程连接时,不管使用何种工具,需要根据IP地址定位到被连接的主机,再通过账号和密码登录该主机,因此,我们需要先获取该IP地址。并且每次连接时,都需要使用到IP,为了保证连接的便利性和稳定性,最好将被连接主机的IP地址设置为固定IP,具体操作如下。
1.进入设置界面
启动被连接的主机(启动时需要连接显示器或使用HDMI采集卡,并且配置完SSH远程访问之后,可以不再使用显示器或HDMI采集卡),并进入设置界面。

2.配置所连接的网络

3.设置固定IP
查看当前IP地址。

设置固定IP。

至此,IP配置完毕。
2.2.环境搭建
概念
SSH(Secure Shell)是一种通用的、功能强大的、基于软件的网络安全解决方案。计算机每次向网络发送数据时,SSH都会自动对其进行加密。数据到达目的地时,SSH自动对加密数据进行解密。整个过程都是透明的,使用OpenSSH工具将会增进你的系统安全性。SSH安装容易、使用简单。
实现
SSH实现架构上分为客户端和服务器端两大部分,客户端是数据的发送方,服务端是数据的接收方,当前场景下,我们需要从本地主机发送数据到远程主机,那么本地主机需要安装并启动SSH客户端,而远程主机则需要安装并启动SSH服务端,整个实现具体流程如下:
-
本地主机安装SSH客户端,远程主机安装SSH服务端;
-
远程主机启动SSH服务;
-
本地主机登陆远程主机;
-
实现数据传输。
1.安装SSH客户端与服务端
默认情况下,Ubuntu系统已经安装了SSH客户端,因此只需要在远程主机安装SSH服务端即可,安装命令如下:
sudo apt install openssh-server如果SSH客户端需要自行安装,那么调用如下命令:
sudo apt install openssh-client2.远程主机启动SSH服务
远程主机启动 ssh 服务命令如下:
sudo /etc/init.d/ssh start启动后可使用如下命令查看服务是否正常运行:
ps -e | grep ssh如果启动成功,会包含 sshd 程序。
以后需要频繁的使用ssh远程登录,为了简化实现,可以将远程主机的ssh服务设置为开机自启动,命令如下:
sudo systemctl enable ssh3.本地远程登录
登录远程主机可以调用如下命令:
ssh -X 用户名@ip地址然后根据提示,录入登陆密码,即可成功登录。
如果退出,可以调用exit命令:
exit4.实现数据传输
通过SSH在本地主机只需调用相关指令,便可方便的实现与远程主机的数据上传或下载,指令格式如下所示:
上传文件指令格式如下:
scp 本地文件路径 账号@ip:路径上传文件夹指令格式如下:
scp -r 本地文件夹路径 账号@ip:路径下载文件指令格式如下:
scp 账号@ip:路径 本地文件夹路径下载文件夹指令格式如下:
scp -r 账号@ip:路径 本地文件夹路径优化
每次远程登录时,都需要输入密码,使用不方便,可以借助密钥简化登录过程,实现免密登录,提高操作效率。实现思想是:生成一对公钥私钥,私钥存储在本地,公钥上传至服务器,每次登录时,本地直接上传私钥到服务器,服务器有匹配的公钥就认为是合法用户,直接创建SSH连接即可。具体实现步骤只有两步:
-
本地生成密钥对;
-
将公钥上传至远程主机。
1.生成密钥对
本地客户端生成公私钥:(一路回车默认即可)
ssh-keygen上面这个命令会在用户目录.ssh文件夹下创建公私钥:
-
id_rsa (私钥);
-
id_rsa.pub (公钥)。
2.公钥上传
上传指令如下:
ssh-copy-id -i ~/.ssh/id_rsa.pub 账号@ip上面这条指令是将本地公钥上传到远程主机的ssh目录下,该目录下有文件authorized_keys保存了公钥内容。
以后再远程登录就无需录入密码了。
2.3.使用VScode优化
上一节,我们介绍了ssh远程连接的使用,但是如果只是纯粹使用ssh也存在一些不足,比如:编辑文件内容时,需要使用vi编辑器,且在一个终端内,无法同时编辑多个文件。本节将介绍一更为实用的功能——VSCode结合插件实现远程开发,这使我们可以以图形化的方式实现远程开发,比ssh的使用更方便快捷,可以大大的提高程序开发效率。
1.准备工作
VScode远程开发依赖于ssh,请首先按照上一节内容配置ssh远程连接。
2.为VScode安装远程开发插件
启动VScode,首先点击侧边栏的扩展按钮,然后在扩展:商店的搜索栏输入Remote Development并点击同名插件,最后在右侧显示区中点击安装。

3.配置远程连接
步骤1:使用快捷键ctrl + shift + p打开命令输入窗口,并输入Remote-SSH:Connect to Host...,弹出列表中选择与之同名的选项。

步骤2:步骤1完成将弹出一个新的命令窗口如下,选择下拉列表中的 Add New SSH Host。

步骤3:步骤2完成又将弹出一个新的命令窗口,在其中输入:ssh -X ubuntu@192.168.43.164,其中,ubuntu需要替换为你的登录用户名,192.18.43.164 则替换为被远程连接主机的ip地址。

步骤4:选择步骤3完成后的弹窗列表中的第一个选项(或直接回车),即可完成配置,配置成功后会有提示信息。


4.使用
步骤1:继续使用快捷键ctrl + shift + p打开命令输入窗口,并输入Remote-SSH:Connect to Host...,此时列表中将显示步骤3中配置的ip地址,直接选择,选择后,VScode将打开一个新的窗口。

或者,也可以点击侧边栏的远程资源管理器,在弹出的服务器列表中选择要连接的服务器,并右击,选择在本窗口或新窗口中实现远程连接。

步骤2:选择菜单栏的文件下的打开文件夹,在弹窗列表中选择需要打开的文件夹并点击确定即可。

最终,我们就可以像操作本地文件一样实现远程开发了。
3.远程桌面
因为用X11转发效率太低太低,所以还是要选用远程访问桌面的形式来看Rviz2和Gazebo等等(如果有需求的话)
我们选择使用VNC来看。
- 安装VNC服务器:
这里以TigerVNC为例进行安装:
sudo apt install tigervnc-standalone-server tigervnc-common- 设置VNC密码:
为VNC用户设置密码,运行以下命令:
vncpasswd- 配置VNC启动脚本:
创建VNC配置文件,在用户家目录内的.vnc文件夹中创建启动文件:
mkdir -p ~/.vnc
nano ~/.vnc/xstartup
在打开的编辑器里面输入以下内容(以GNOME为例):
#!/bin/sh
unset SESSION_MANAGER
unset DBUS_SESSION_BUS_ADDRESS
gnome-session
保存并退出(在nano中按Ctrl + O保存,然后按Ctrl + X退出)。
- 给予执行权限:
为xstartup文件设置执行权限:
chmod +x ~/.vnc/xstartup- 启动VNC服务器:
vncserver -geometry 1920x1080 -localhost=0geometry 选项指定窗口大小,localhost 选项设为 0 以开放连接。(设为1是只允许本地连接)
你将看到类似于:1的输出,这表示VNC会话的显示编号。例如,如果输出为:1,则VNC监听的端口为5901(5900 + 显示编号)。
- 查看已开启的VNC服务器:
vncserver -list
- 连接到VNC服务器:
使用VNC客户端(如vncviewer)连接到VNC服务器,输入你的服务器IP和端口。例如,如果服务器IP为192.168.31.10,且显示编号为1,你应该连接到192.168.31.10:1,或者直接输入192.168.31.10:5901。
- 停止VNC服务器:
如果需要停止VNC服务器,可以使用以下命令:
vncserver -kill :1将:1替换为你实际使用的显示编号。


4.USB端口设置
首先先配置好权限
# 将用户权限提高
sudo usermod -aG dialout $USER
newgrp dialout

# 查看下面命令是否输出dialout(若输出才正常)
groups
因为我们插拔USB设备,他的端口号可能会一直变,所以我们要给他的tty起一个固定的别名。
4.1.根据USB设备绑定端口(多个不同设备)
需求: Ubuntu系统中现接入雷达和智能小车,请为二者绑定端口。
实现原理: 可以通过USB设备本身的“标识”实现端口绑定。
流程如下:
(1).查找设备idVendor和idProduct
接入两个USB设备,在终端调用指令lsusb查看显示系统中以及连接到系统的USB设备信息。

如上图所示,红色方框内数据为USB设备,ID后面的1a86:7523分别为USB的idVendor和idProduct(两个参数之间使用”:“分隔)。
另外:可以通过重新插拔比较的方式确定哪些数据对应接入的USB设备。
(2).编写映射规则
在/etc/udev/rules.d目录下新建文件xxx.rules(文件名自定义)
sudo vim /etc/udev/rules.d/xxx.rules输入如下内容:
KERNEL=="ttyUSB*", ATTRS{idVendor}=="10c4", ATTRS{idProduct}=="ea60", MODE:="0777", SYMLINK+="mylidar"
KERNEL=="ttyUSB*", ATTRS{idVendor}=="1a86", ATTRS{idProduct}=="7523", MODE:="0777", SYMLINK+="mycar"
代码解释:
-
KERNEL是内核固定名称,这里统一是“ttyUSB*”;
-
MODE是节点权限,通常改为“0777”,表示可读写可运行;
-
SYMLINK是符号连接,即绑定的别名;
-
ATTRS是设备厂商的唯一标识,idVendor和idProduct正好组成上面通过lsusb查找到的设备ID。
***小提示:***一般的USB设备供应商都会提供类似的脚本文件,对于调用者而言,直接复制该文件到/etc/udev/rule.d目录即可。
| 设备类型 | 内核名称示例 | 说明 |
|---|---|---|
| USB 串口设备 | ttyUSB* | USB 转串口设备,如 /dev/ttyUSB0 |
| 串口设备 | ttyS* | 物理串口设备,如 /dev/ttyS0 |
| 存储设备 | sd* | SCSI 磁盘设备,如 /dev/sda |
| 网络设备 | eth* | 以太网设备,如 /dev/eth0 |
| 输入设备 | event* | 输入事件设备,如 /dev/input/event0 |
| 蓝牙设备 | rfcomm* | 蓝牙串口设备,如 /dev/rfcomm0 |
(3).使规则生效
在终端下输入如下指令:
# Ubuntu用下方命令
sudo service udev reload
sudo service udev restart

#Fedora用下方命令
sudo udevadm control --reload
sudo udevadm trigger
再重新插拔设备即可。
(4).测试
终端下输入如下指令
ll /dev | grep ttyUSB运行结果如下:


也可以多次插拔USB设备,会发现设备端口ttyUSBn中的n编号会变动,但是别名是始终可以指向对应的USB设备的。至此,就可以使用别名来关联所需使用的USB设备了。
缺点:
上述实现也存在一定的局限性,当Ubuntu接入两台或多台相同型号的USB设备时,由于设备ID是一样的,该种实现方式只会对其中的一台设备生效,这种情况下,就需要通过第二种策略来实现端口的绑定了。
4.2.根据主机硬件绑定端口(多个相同设备)
需求: 无人车中现接入一前一后两台相同型号的雷达,请为二者绑定端口。
实现原理: USB设备所连接主机的USB接口也是有其“标识”的,可以通过这个标识实现端口绑定。
流程如下:
(1).查看所连接的主机USB接口的KERNELS
调用如下指令查看第一台雷达的USB信息:
udevadm info --attribute-walk --name=/dev/ttyUSB0 | grep KERNELS
udevadm info --attribute-walk --name=/dev/ttyACM0 | grep KERNELS
调用如下指令查看第二台雷达的USB信息:
udevadm info --attribute-walk --name=/dev/ttyUSB1 | grep KERNELS运行结果相比较不同的KERNELS,第一台雷达端口地址为KERNELS==1-1.3:1.0,第二个雷达端口地址为KERNELS==1-1.4:1.0。可以使用此数据作为不同端口的“唯一性标识”。
(2).编写映射规则
在/etc/udev/rules.d目录下新建文件xxx.rules(文件名自定义),输入如下内容:
sudo vim /etc/udev/rules.d/xxx.rulesKERNEL=="ttyUSB*", KERNELS=="1-1.3:1.0", MODE:="0777", SYMLINK+="rplidar_front"
KERNEL=="ttyUSB*", KERNELS=="1-1.4:1.0", MODE:="0777", SYMLINK+="rplidar_back"(3).使规则生效
在终端下输入如下指令:
# Ubuntu用下方命令
sudo service udev reload
sudo service udev restart

#Fedora用下方命令
sudo udevadm control --reload
sudo udevadm trigger
再重新插拔设备即可。
(4).测试
终端下输入如下指令,运行结果如下:
ll /dev | grep ttyUSB
至此,就可以使用别名来关联所需使用的USB设备了。
缺点: USB设备必须连接在主机的指定端口上,否则,会导致端口绑定失败,或产生逻辑错误。(而且增加新设备可能会导致端口改变)
4.3.根据其他属性绑定端口
(1).查看所连接的主机USB接口的信息
udevadm info -a -p $(udevadm info -q path -n /dev/ttyACM0)
udevadm info -a -p $(udevadm info -q path -n /dev/ttyUSB0)
这些数据都是不会变的,所以可以拿这些数据来做标识
(2).编写映射规则
在/etc/udev/rules.d目录下新建文件xxx.rules(文件名自定义),输入如下内容:
sudo vim /etc/udev/rules.d/xxx.rulesKERNEL=="ttyACM*", ATTRS{idVendor}=="1a86", ATTRS{idProduct}=="55d4", ATTRS{serial}=="0001", MODE:="0777", SYMLINK+="ttyACM_Lidar"
KERNEL=="ttyACM*", ATTRS{idVendor}=="1a86", ATTRS{idProduct}=="55d4", ATTRS{serial}=="0002", MODE:="0777", SYMLINK+="ttyACM_MCU"
KERNEL=="ttyUSB*", ATTRS{idVendor}=="1a86", ATTRS{idProduct}=="7523", MODE:="0777", SYMLINK+="ttyUSB_IMU"(3).使规则生效
在终端下输入如下指令:
# Ubuntu用下方命令
sudo service udev reload
sudo service udev restart

#Fedora用下方命令
sudo udevadm control --reload
sudo udevadm trigger
再重新插拔设备即可,或者 直接重启系统。
(4).测试
终端下输入如下指令ll /dev | grep ttyUSB,运行结果如下:

至此,就可以使用别名来关联所需使用的USB设备了。
缺点: 一些设备可能没有串口号等。
4.4.其他注意事项
并非所有的USB设备端口号都是ttyUSBn的格式,比如Arduino的端口号可能是ttyACMn,而对于USB摄像头而言,一台设备则对应两个端口号,分别是videon和video(n+1),并且启用摄像头设备一般使用的是videon端口,绑定时需要关联的也是该接口。
但是无论是外接何种USB设备,也不管采用上述两种方案的哪一种进行端口绑定,其原理都是类似的,只是实现细节不同而已。如果是外接的Arduino设备,那么需要在rules文件中的将KERNEL=="ttyUSB*"修改为KERNEL=="ttyACM*",如果外接的是USB摄像头,那么则需要在rules文件中的将KERNEL=="ttyUSB*"修改为类似于KERNEL=="video[0,2,4,6]"的格式,其中video[0,2,4,6]表示可以绑定的端口为video0或video2或video4或video6。
5.Linux分区Gui工具
sudo apt install gparted
sudo dnf install gparted6.DDNS
7.挂载内网网页
可以把本地的网页挂载到路由器端,或者同内网段其他设备上,甚至可以挂载在本地。
下面以安卓设备为例子,由于安卓设备暂时不能直接打开html,所以我们可以把html挂载到本地服务器,再通过浏览器查看。
由于安卓系统基于Linux内核,所以我们可以下载一个叫termux的app来敲一些Linux命令:
https://github.com/termux/termux-app
首先打开app后,先更新软件缓存:
pkg update然后换源
nano $PREFIX/etc/apt/sources.list将该文件内容替换为下面:
deb https://mirrors.bfsu.edu.cn/termux/termux-packages-24 stable main-
如果你使用的是
nano编辑器:-
按
Ctrl+O保存文件。 -
按
Enter确认文件名。 -
按
Ctrl+X退出编辑器。
-
-
如果你使用的是
vim编辑器:-
按
Esc退出编辑模式。 -
输入
:wq保存并退出。
-
接下来重新更新软件源:
pkg update && pkg upgrade安装python:
pkg install python3通过Termux访问设备存储 :
如果文件在安卓设备上,可以使用Termux的文件管理器访问设备的存储:
termux-setup-storage-
进入HTML文件所在的目录 :
- 使用
cd命令进入HTML文件所在的目录:
- 使用
cd ~/your_html_folder-
启动Python HTTP服务器 :
- 运行以下命令启动一个简单的HTTP服务器:
python3 -m http.server 8000- 这会在端口
8000上启动一个Web服务器。
- 启动服务器后,Termux会显示日志信息,例如:
Serving HTTP on 0.0.0.0 port 8000 (http://0.0.0.0:8000/) ...- 这表示服务器已成功启动。
在浏览器中访问HTML文件
-
在同一设备上访问 :
- 打开安卓设备上的浏览器(如Chrome),输入以下地址:
http://localhost:8000- 如果HTML文件中有
index.html,它会自动加载;否则,你需要手动点击文件链接。
8.RustDesk
8.1.RustDesk无人值守远程控制
目前rustdesk还没办法进行无人值守在wayland下,所以我们需要把登陆密码,锁屏和休眠待机全部关掉.
8.1.1.设置 KDE6 自动登录
- 可以先查自己的sddm类型
ls /usr/share/xsessions/ls /usr/share/wayland-sessions/看哪个会输出东西,输出东西的文件夹就是你拥有的sddm,比如xsessions输出内容的话,那就是x11的sddm,如果wayland-sessions输出内容的话你就是wayland的sddm.
- 编辑 SDDM 配置:
sudo nano /etc/sddm.conf在文件最上面有个[Autologin],在这个底下加入下面的内容:
[Autologin]
User=你的用户名
Session=plasma.desktop # 或 plasma.desktop(X11),方案一可用 Wayland- 保存退出后重启 SDDM:
sudo systemctl restart sddm✅ 开机后自动进入桌面,无需输入密码
8.1.2.关闭锁屏在 KDE6 系统设置里:
打开 系统设置 → 屏幕锁定(Screen Locking) 关闭自动锁定 关闭屏幕关闭 / 屏幕保护锁定 这样 RustDesk 可以开机后直接控制桌面,不会被锁屏阻挡
8.1.3.关闭休眠系统设置 → 电源管理(Power Managerment)
禁用“休眠”或“自动挂起” 保证电脑开机一直在线,RustDesk 可随时远控 如果必须休眠,可在 BIOS 设置里禁用休眠,保证开机即联网
8.2.RustDesk自建服务器
8.2.1.在服务器端安装
8.2.1.1.命令行方式

- 用ssh访问你需要安装RustDesk的服务器
ssh tungchiahui@10.0.0.4
- 使用方法二的命令

wget https://raw.githubusercontent.com/techahold/rustdeskinstall/master/install.sh
chmod +x install.sh
./install.sh
./install.sh的设置看下一节
- 配置与查看KEY
这里如果你是想直接用公网ip则选择1)IP,如果你是DDNS等用域名绑定了IP地址,则选择2).

这个选2)No

这个是KEY,要复制下来,等后面软件配置的时候要用.

-
配置防火墙
- 如果你是Debian系 安装防火墙
sudo apt install ufw配置防火墙
sudo ufw allow 22 ufw allow 21114:21119/tcp ufw allow 21116/udp sudo ufw enable- 如果你是RHEL系 安装防火墙
# 如果你是RHEL系
sudo dnf install firewalld
sudo systemctl enable --now firewalld
配置防火墙
sudo firewall-cmd --add-port=22/tcp --permanent
sudo firewall-cmd --reload

sudo firewall-cmd --add-port=21114-21119/tcp --permanent
sudo firewall-cmd --reload

sudo firewall-cmd --add-port=21116/udp --permanent
sudo firewall-cmd --reload

sudo systemctl enable --now firewalld
8.2.1.2.1Panel方式
- 在面板里搜RustDesk并安装

- 配置防火墙

添加几个端口


- 查看KEY

复制KEY

8.2.2.自建服务器后配置RustDesk软件
- PC端


出现就绪就是配置成功了

- 移动端


8.2.2.1.注意的问题
如果你是家庭的内网服务器,则需要让路由器也放行对应端口
找到openwrt防火墙设置,点击添加


然后还有ipv6也要进行放行,那个debian一般默认ipv6不设防,但是会被上游openwrt防住,所以,要在openwrt里开启对应规则。
去防火墙 - 通信规则里添加下面俩配置。
Allow-RustDesk-IPv6-TCP
WAN → LAN
目标:你服务器的ipv6公网
TCP 21115-21119
动作:接受转发

Allow-RustDesk-IPv6-UDP
WAN → LAN
目标:你服务器的ipv6公网
UDP 21116
动作:接受转发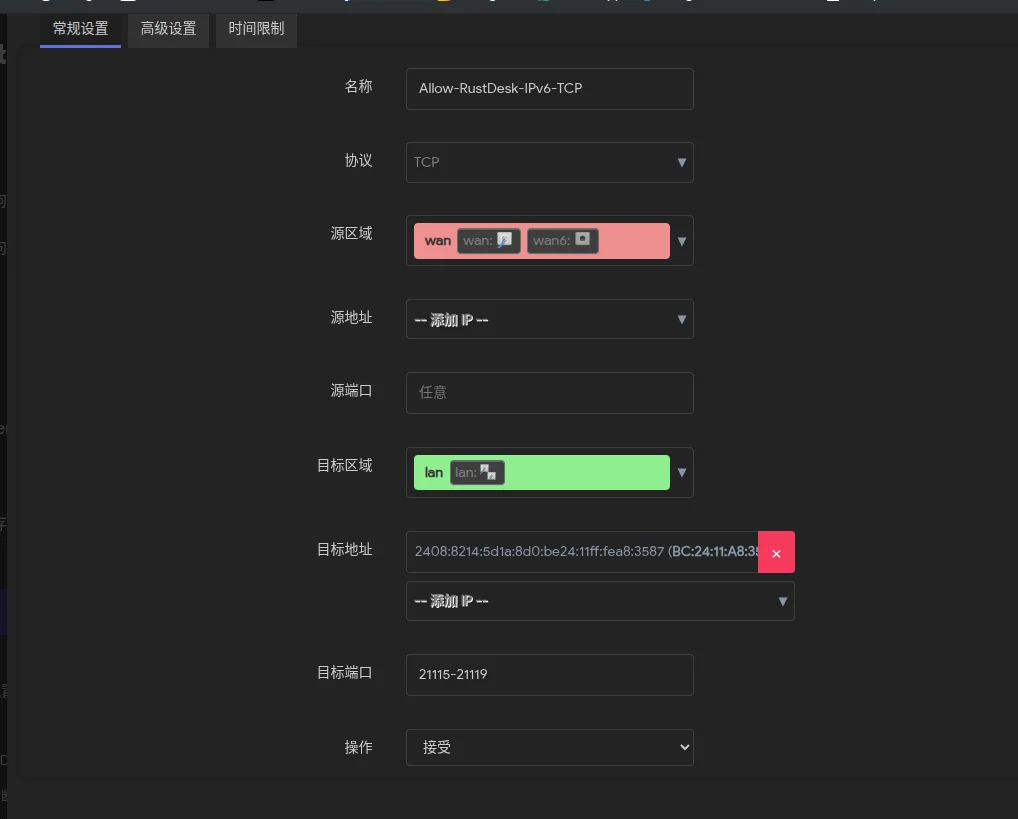
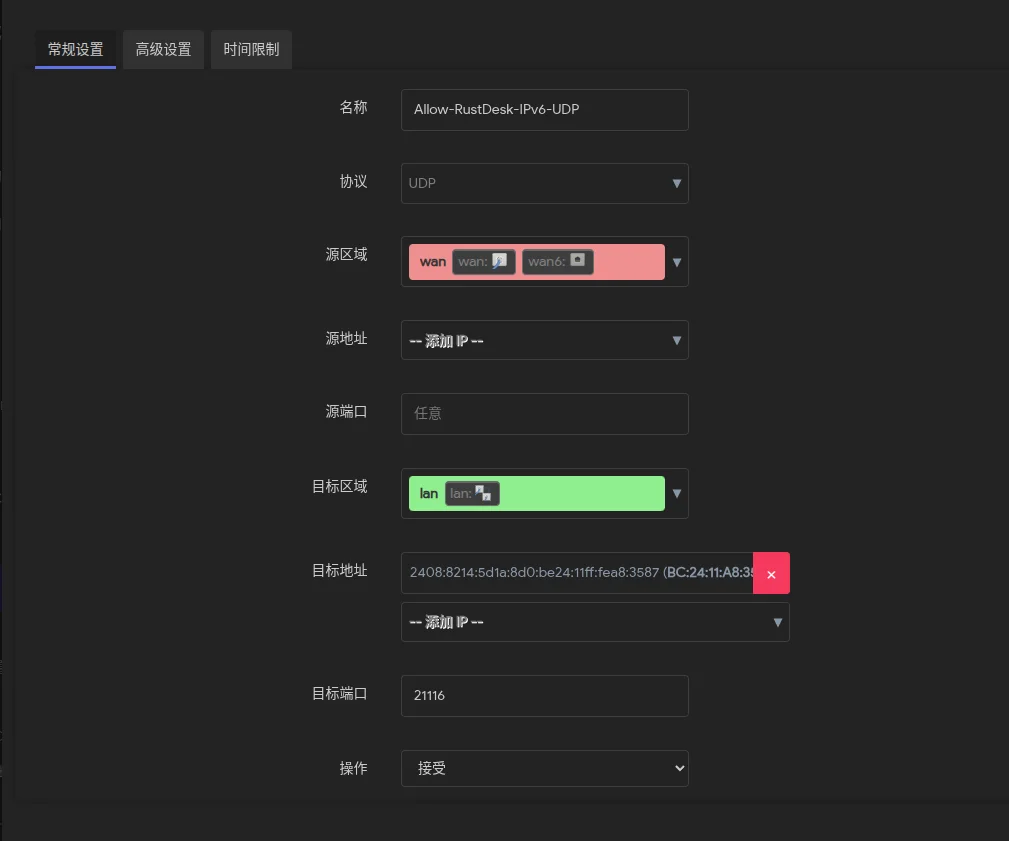
这样才可以让你的服务器端口被真正成功放行.
9.WireGuard
9.1.简介
WireGuard是用于在室外通过VPN来访问内网设备的一种工具.
这里我的教程将会教你如何在室外访问你家里的内网设备.
9.2.我的环境
9.2.1.内网
家庭内网网段:10.0.0.0/24

9.2.2.外部设备
如果你是在办公室等地方链接办公室的wifi,那么你需要知道室外内网网段,如果你直接用手机数据流量的话,那么什么都不需要知道.
室外内网网段:192.168.31.0/24
室外数据流量运营商:中国联通
9.3.安装
9.3.1.服务端-软路由端
SSH登录OpenWrt,或者用LuCI界面:
opkg update
opkg install wireguard-tools luci-proto-wireguard kmod-wireguard qrencode
装完刷新一下浏览器LuCI页面.
9.3.2.客户端-手机,电脑端
https://www.wireguard.com/install/
- Android
https://play.google.com/store/apps/details?id=com.wireguard.android&hl=zh&pli=1
- iOS
美区:https://apps.apple.com/us/app/wireguard/id1441195209 日区:https://apps.apple.com/jp/app/wireguard/id1441195209 台区:https://apps.apple.com/tw/app/wireguard/id1441195209
-
Linux
- Fedora
sudo dnf install wireguard-tools- Ubuntu/Debian
sudo apt install wireguard9.4.配置
9.4.1.服务端-初始化配置
在luci界面中,点击网络 → 接口 → 添加新接口
- 协议选 WireGuard VPN
- 名称填 wg0
- 点下一步,进到详情页

按照上图的步骤,依次配置.
这里解释一下.
监听端口:51820(可自定义,使用一个未被占用的端口即可,记住这个端口,不懂的话就照我的设置)
IP地址:10.10.10.1/24(VPN内网网段,跟你软路由的局域网段不能冲突,不懂的话就照我的设置)
你必须确保你的家庭内网网段和你的室外内网网段以及刚才填的那个IP地址不能属于同一网段.
比如我的家庭内网网段是10.0.0.0/24,而室外内网网段是192.168.31.0/24,VPN的网段10.10.10.0/24.
然后点击防火墙设置,选择WireGuard.

9.4.2.服务端-对端配置
这里配置的就是你的手机/笔记本作为客户端连进来的信息:
这个界面很方便,LuCI可以直接帮你生成客户端的密钥对并直接导出配置文件/二维码,不需要你手动在手机上先生成公钥再倒腾过来,效率高很多。按下面顺序填:
- 描述 phone (或者你自己好记的名字,比如"iPhone17")
- 公钥 + 私钥 —— 直接点"生成新的密钥对" 点这个按钮,系统会自动帮你同时生成一对新的公钥+私钥,并自动填到"公钥"和"私钥"两个框里。 这个做法比你自己在手机App里生成再抄公钥过来省事得多,因为最后可以直接导出完整配置文件甚至二维码给手机扫码导入,私钥也是配置好的,不用手动输入。
- 预共享密钥(PSK) —— 建议点"生成预共享密钥" 这是可选的额外加密层,加上更安全(抗未来量子计算破解),点一下"生成预共享密钥"按钮自动填好即可,不需要手动操作。
- 允许的IP 点绿色+号,填: 10.10.10.2/32 这是分配给这台手机的隧道内网IP(如果以后要加第二台设备,比如笔记本,就用10.10.10.3/32,以此类推)。
- 为允许的IP创建路由 —— 勾选 这个决定了服务端要不要给这个IP自动建路由,勾上,否则服务端不知道怎么把去往10.10.10.2的包转发给这个peer。
- 对端地址 (Image 2) 这个字段填的是客户端的地址,但因为你的手机是移动设备、IP会变,服务端这边留空即可,不用填。(这个字段一般是给"两个固定IP的服务器互联"场景用的,你这种手机/笔记本客户端场景不需要)
- 对端端口 同理,留空或者保持默认51820占位符不用管,服务端这边这个字段对客户端场景没意义,跳过。
- 持续保持连接(Persistent Keepalive) 填: 25 因为手机大概率处在NAT环境下(无论是WiFi还是4G/5G),这个值能防止连接因为长时间无流量被NAT设备判定断开。
- 保存后 —— 点"生成配置..." 这一步是重点:全部填完先点右下角"保存",保存完之后再进来点 配置导出 那个"生成配置..."按钮,系统会:
自动生成一份完整的客户端配置文件(包含私钥、服务端公钥、Endpoint地址等全部信息) 通常还会显示一个二维码
手机WireGuard App直接扫这个二维码就能一键导入配置,完全不用你手动输入任何字段,最省事。
-
填完这些保存之后,点"生成配置"

- 连接端点 —— 改成DDNS域名
没有ddns域名的请看ddns教程.
现在显示的是
112.233.39.5这个具体的公网IPv4,这是系统自动探测到的当前公网IP,但建议改成:ddns.xxxxxx.cn原因很简单:家庭宽带的公网IP大概率是动态的(如果你是中国移动,你完全不需要担心这件事情,你没有公网ipv4,你只有公网ipv6),过一阵子运营商重新分配IP后,这个写死的IP就失效了,配置文件也就废了。用DDNS域名的话,只要你路由器上的DDNS客户端正常更新,域名自动跟着IP变化解析,配置文件永久有效,不用来回改。 直接把这个下拉框里的值改成ddns.tungchiahui.cn即可,如果下拉框里没有这个选项,看能不能手动输入替换。 - 允许的IP —— 这个要看你的使用需求,建议改 现在是 0.0.0.0/0 + ::/0,意思是全局代理模式:连上VPN后,手机/电脑的所有上网流量(刷网页、看视频、聊天全部)都会先绕道回你家里,再从家里的网络出去上网。 这跟最初的需求("在外面访问家里NAS")不太一致,全局模式的影响:
✅ 优点:所有流量都通过加密隧道,公共WiFi环境下更安全 ❌ 缺点:手机所有网络流量的速度都取决于你家宽带的上传带宽,如果你家是常见的百兆宽带(上传可能才几十M甚至更低),刷视频、下载会明显变慢;而且家里NAT要承担所有流量的转发压力
如果你只是想访问家里内网的NAS/PVE/Debian,建议改成分离隧道模式,把这两行改成: 10.10.10.0/24 10.0.0.0/24 删掉 0.0.0.0/0 和 ::/0 这两行(点它们右边的红色×号),只保留上面这两个网段。这样只有"访问家里内网"这一类流量才走VPN隧道,其他正常上网流量不受影响,速度不受影响。 如果你确实希望VPN也当"全局代理"用(比如出门用境外的WiFi想用家里的网络环境访问某些内容),那就保留 0.0.0.0/0 不用改。
- DNS服务器:10.0.0.1 —— 这是你家庭内网的软路由的LAN地址,连VPN后用它解析域名没问题,能顺带解析你家内网可能配置的一些本地域名
- 地址:10.10.10.2/32 —— 这个就是你想给你的这个手机分配一个VPN网段
- 连接端点 —— 改成DDNS域名
没有ddns域名的请看ddns教程.
现在显示的是

然后掏出手机的客户端,使用QRcode导入配置即可.

9.4.3.服务端-防火墙设置
需要加的规则 去 网络 → 防火墙 → 通信规则(Traffic Rules),点"添加":

名称:WireGuard(随便起) 协议:UDP 或者 TCP/UDP 源区域:wan 目标区域:设备(输入) —— 因为WireGuard监听的是软路由本机端口,不是转发给内网其他设备 目标端口:51820(跟你wg0接口"监听端口"那里填的一致) 操作:接受(Accept)

保存,应用。
9.4.4.客户端
拿iOS举例子
我这里使用数据流量来测试,使用的是中国联通4G.
像使用普通的VPN一样打开你导入的这个配置即可.

9.5.测试
然后可以尝试访问你的内网设备, 比如我的 openwrt是10.0.0.1, pve是10.0.0.2, nas是10.0.0.5都可以被正常访问了.


9.6.将WireGuard交由Clash Meta管理(可选)
9.6.1.将纯WireGuard配置放入Clash Meta
如果手机或电脑上已经长期运行支持Mihomo / Clash Meta内核的客户端,再单独启动WireGuard客户端会比较麻烦,而且同一台移动设备通常不能同时启用两个VPN隧道。
因此,可以将WireGuard节点直接写入Clash Meta配置,让Clash Meta统一负责:
- 普通互联网流量直连;
- 家庭内网流量通过WireGuard访问;
- 根据规则自动判断流量应该走哪个出口。
本节只介绍不包含机场或其他代理节点的纯WireGuard配置。
配置完成后,不再需要打开独立的WireGuard客户端。使用该配置时,应关闭WireGuard App中的隧道,只打开Clash Meta。
9.6.1.1.查看WireGuard客户端参数
先打开已经能够正常使用的WireGuard客户端配置,需要记录以下信息:
| Clash Meta字段 | WireGuard客户端中的对应字段 |
|---|---|
server |
Peer中的Endpoint域名或公网IP |
port |
Peer中的Endpoint端口 |
ip |
Interface中的Addresses,只填写IPv4地址,不写/32 |
private-key |
Interface中的Private key |
public-key |
Peer中的Public key,也就是WireGuard服务器公钥 |
pre-shared-key |
Peer中的Preshared key |
persistent-keepalive |
Peer中的Persistent keepalive |
这里最容易弄错的是两个公钥:
- Interface中的Public key是当前客户端的公钥,不能填入Clash Meta的
public-key; - Peer中的Public key才是WireGuard服务器公钥,需要填入Clash Meta的
public-key。
这一张图同时包含Interface和Peer两部分,已经足够说明各个字段应该从哪里获取,不需要再增加其他截图。
9.6.1.2.创建YAML配置
新建一个扩展名为.yaml的文件,例如:
home-wireguard.yaml写入下面的模板:
# 仅让家庭内网流量通过WireGuard
# 普通互联网流量保持直连
# 启用本配置时,不要同时开启独立的WireGuard客户端

mixed-port: 7890
allow-lan: false
mode: rule
log-level: info
ipv6: true

tun:
  enable: true
  stack: mixed
  auto-route: true
  auto-detect-interface: true

proxies:
  - name: 家庭-WG
    type: wireguard

    # WireGuard客户端Peer中的Endpoint
    server: ddns.example.com
    port: 51820

    # WireGuard客户端Interface中的Addresses
    # 例如原配置为10.10.10.2/32,这里只填写10.10.10.2
    ip: 10.10.10.2

    # WireGuard客户端Interface中的Private key
    private-key: "gBzeTbZH..."

    # WireGuard客户端Peer中的Public key,即服务器公钥
    # 不要填写Interface中的客户端公钥
    public-key: "UUS0nrKE..."

    # WireGuard客户端Peer中的Preshared key
    pre-shared-key: "NGYvFsCle..."

    allowed-ips:
      - 0.0.0.0/0

    udp: true
    persistent-keepalive: 25
    mtu: 1380

rules:
  # 家庭局域网网段
  - IP-CIDR,10.0.0.0/24,家庭-WG,no-resolve

  # WireGuard隧道网段
  - IP-CIDR,10.10.10.0/24,家庭-WG,no-resolve

  # 其他网络流量保持直连
- MATCH,DIRECT9.6.1.3.修改模板中的参数
需要按照自己的WireGuard配置修改以下内容。
1. server
将:
server: ddns.example.com改成WireGuard客户端Peer中Endpoint冒号前面的域名或公网IP。
例如Endpoint为:
ddns.example.com:51820那么填写:
server: ddns.example.com2. port
填写Endpoint冒号后面的端口,例如:
port: 518203. ip
填写WireGuard客户端Interface中的Addresses,但不要填写CIDR后缀。
例如原配置是:
10.10.10.2/32Clash Meta中填写:
ip: 10.10.10.24. private-key
填写WireGuard客户端Interface中的Private key:
private-key: "客户端私钥"5. public-key
填写WireGuard客户端Peer中的Public key,也就是服务器公钥:
public-key: "服务器公钥"不要误填Interface中的Public key。Interface中的Public key属于当前客户端,Peer中的Public key才属于服务器。
6. pre-shared-key
填写WireGuard客户端Peer中的Preshared key:
pre-shared-key: "预共享密钥"WireGuard密钥是Base64字符串,复制时不要漏掉末尾可能存在的=。
7. rules
将规则中的家庭局域网网段和WireGuard隧道网段改成自己的实际网段。
例如:
rules:
  - IP-CIDR,10.0.0.0/24,家庭-WG,no-resolve
  - IP-CIDR,10.10.10.0/24,家庭-WG,no-resolve
  - MATCH,DIRECT
表示:
- 访问
10.0.0.0/24家庭局域网时走WireGuard; - 访问
10.10.10.0/24WireGuard隧道网段时走WireGuard; - 其他流量全部直连,不经过家庭宽带。
9.6.1.4.关于allowed-ips
模板中的:
allowed-ips:
  - 0.0.0.0/0
可以保持不变。
它表示这个WireGuard代理节点能够承载全部IPv4流量,但实际哪些流量交给WireGuard,仍然由最下面的rules决定。
例如:
rules:
  - IP-CIDR,10.0.0.0/24,家庭-WG,no-resolve
  - IP-CIDR,10.10.10.0/24,家庭-WG,no-resolve
  - MATCH,DIRECT
在这套规则下,只有家庭内网和WireGuard隧道网段走WireGuard,其他互联网流量继续直连。
需要注意,WireGuard服务端Peer中的Allowed IPs仍然应该是分配给该客户端的地址,例如:
10.10.10.2/32不要把WireGuard服务端Peer中的Allowed IPs改成0.0.0.0/0。
9.6.1.5.导入并测试
将YAML文件导入支持Mihomo / Clash Meta内核的客户端,然后:
- 关闭独立的WireGuard客户端隧道;
- 在Clash Meta中选择刚才导入的配置;
- 使用“规则”模式;
- 打开Clash Meta连接开关;
- 访问家庭内网设备进行测试。
例如访问软路由:
http://10.0.0.1或者在iOS文件App中连接NAS:
smb://10.0.0.5同时可以进入WireGuard服务端,查看对应Peer的Latest Handshake。
如果开启Clash Meta后握手时间刷新,并且能够访问家庭内网设备,就说明配置成功。
9.6.1.6.常见问题
如果YAML能够启动,但无法产生WireGuard握手,优先检查:
public-key是否误填成客户端公钥;private-key是否为当前客户端私钥;pre-shared-key是否完整,末尾的=是否遗漏;ip是否与服务端分配给该Peer的地址一致;- Endpoint域名和端口是否正确;
- 软路由防火墙是否已经放行WireGuard端口;
- 独立WireGuard客户端是否仍然处于开启状态。
如果报错类似:
decode pre shared key: illegal base64 data通常说明pre-shared-key复制不完整,常见原因是末尾的=被遗漏。
9.6.2.将WireGuard加入包含代理节点的YAML
10.Alist
10.1.简介
10.2.安装
10.3.WebUI
10.4.S3协议
10.4.1.开启S3
先进行使能S3协议。

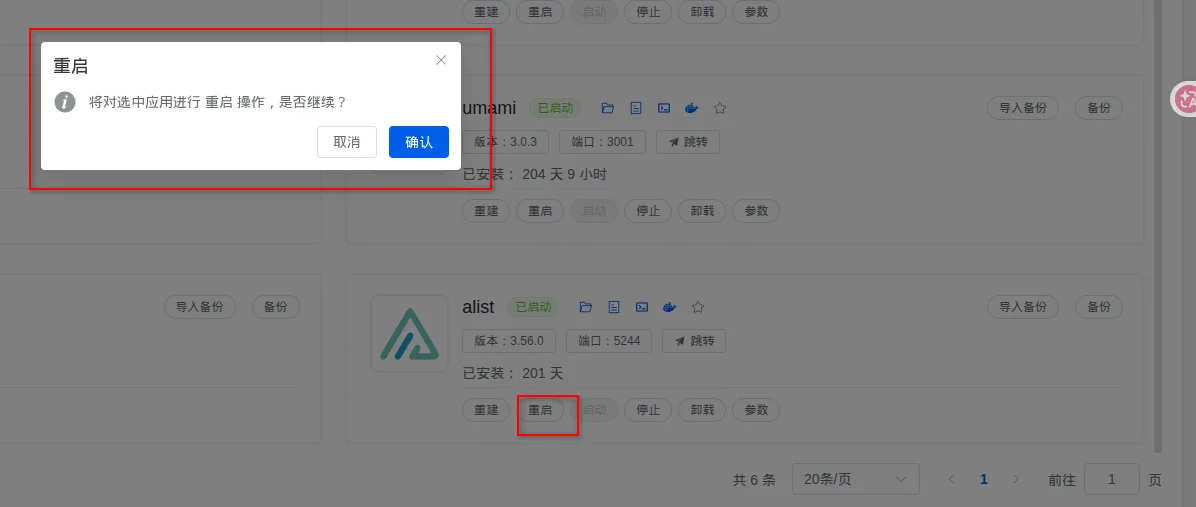
去/opt/1panel/apps/alist/alist/data/data目录修改掉如下图的设置从false改成true。
"s3": {
  "enable": true,
  "port": 5246,
  "ssl": false
}
最后点击重启。
10.4.2.测试S3链接
在部署AList服务器本身敲
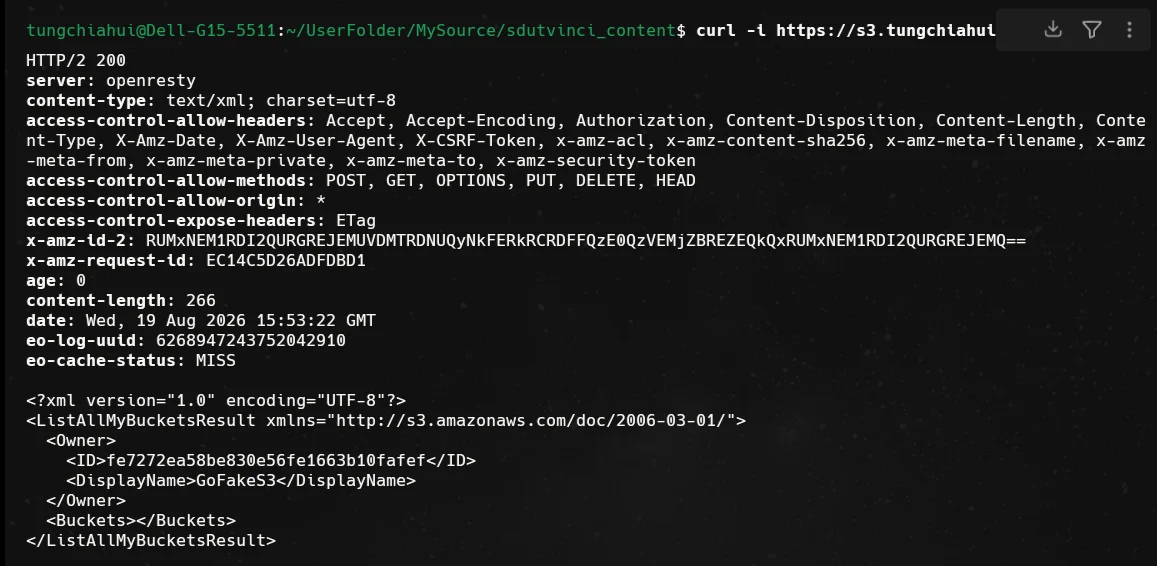
curl -i http://127.0.0.1:5246/如果显示HTTP/1.1 200 OK,那证明是OK的。

后续我也把他反向代理成了一个域名s3.tungchiahui.cn,经测试,也没毛病:
10.4.3.配置S3
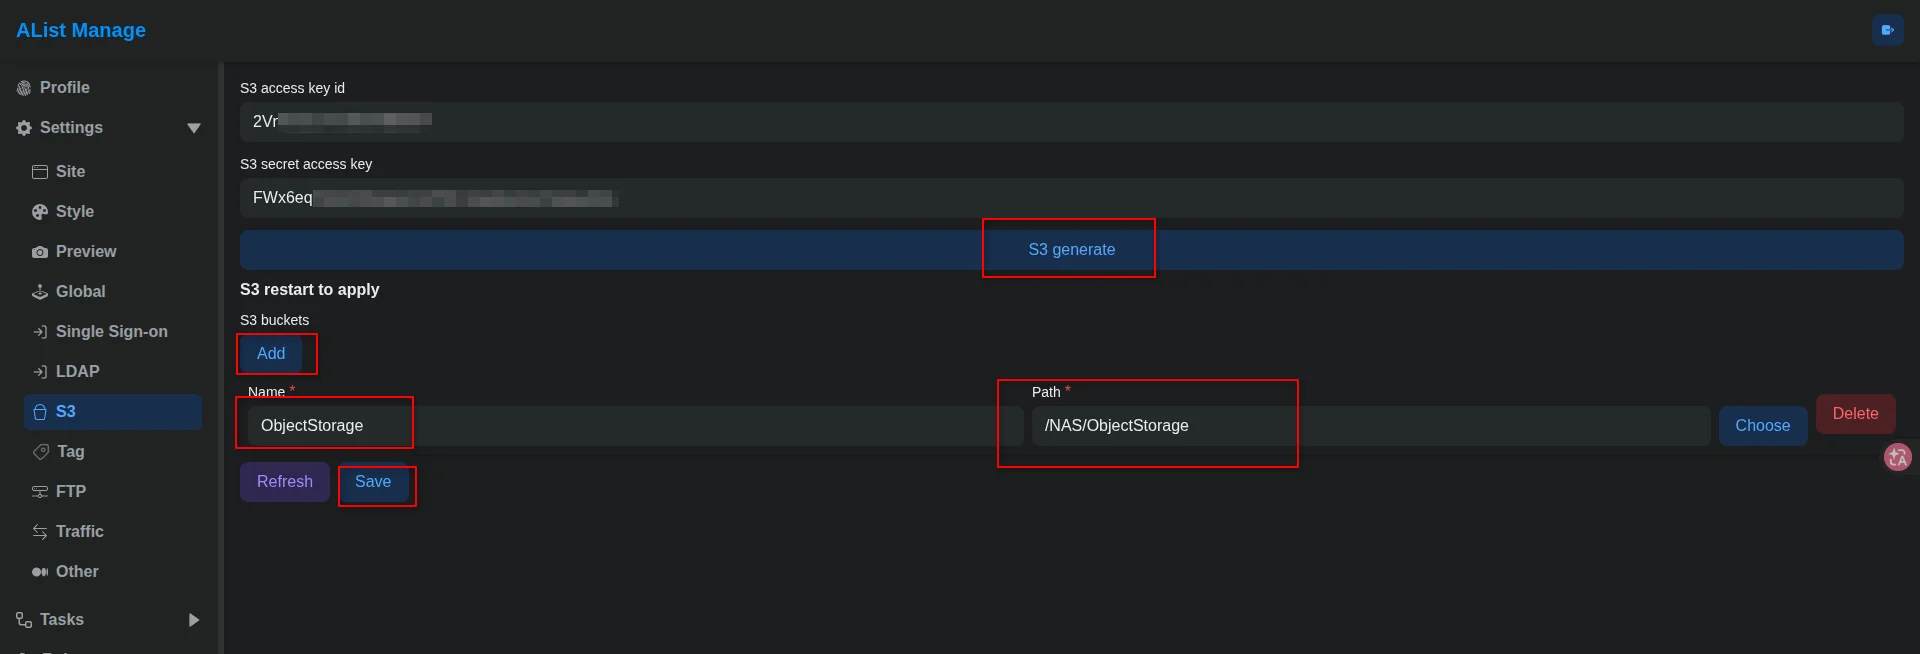
在AList的管理界面找到设置里的S3,然后点底下的Add来添加哪个路径为桶:
- Name就是桶的名字
- Path是你想让AList的哪个路径作为桶子的根目录
- S3 access key id 是S3授权ID
- S3 secret access key是S3授权密钥
10.4.4.测试S3
先准备好你的配置
Endpoint:
http://127.0.0.1:5246
或者
https://s3.tungchiahui.cn

Bucket:
ObjectStorage

Access Key:
AList 后台生成的 S3 Access Key ID

Secret Key:
AList 后台生成的 S3 Secret Access Key

Region:
us-east-1
使用一个可以使用S3的软件,比如我使用我做的VScode插件来进行测试。
插件链接如下: https://marketplace.visualstudio.com/items?itemName=tungchiahui.md-image-uploader
我把配置填到了VScode中的settings.json使用我的插件进行了测试:
{
  "mdImageUploader.s3.accessKeyId": "2Vxxxxxxxxxxxxxxxxxxxxxx",
  "mdImageUploader.s3.secretAccessKey": "FWx6xxxxxxxxxxxxxxxxxx",
  "mdImageUploader.s3.endpoint": "https://s3.tungchiahui.cn",
  "mdImageUploader.s3.region": "us-east-1",
  "mdImageUploader.s3.bucket": "ObjectStorage",
  "mdImageUploader.cdnUrl": "https://cdn.tungchiahui.cn",
  "mdImageUploader.datedUploadPath": "/tungwebsite/assets/images",
  "mdImageUploader.undatedUploadPath": "/tungwebsite/assets/images/undate"
}
经过测试,文件已经成功被保存到了桶子里。


10.4.5.创建文件直链
去AList后台
管理
→ 设置
→ 全局
→ 关闭Sign All
如果开着 Sign All,关掉。因为只要全局 Sign All 开着,下面单独存储关签名也没用。AList 官方明确说 Sign All 会给所有文件直链添加签名。


然后找到你的存放AList的桶子的存储地点进行编辑。

关闭启用签名 / Enable signing。
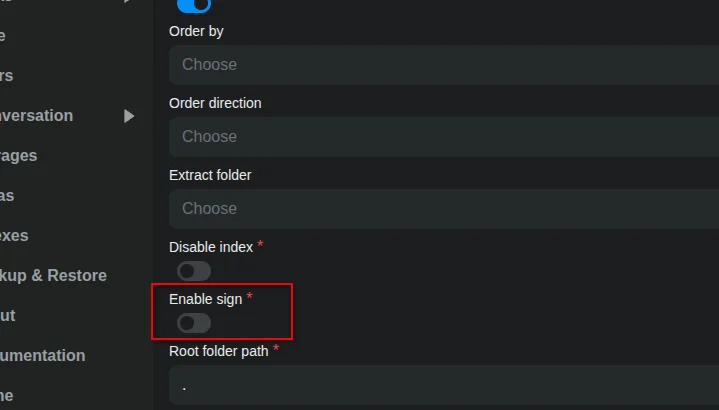
然后保存。
然后你可以通过来访问文件了。
高阶操作(可选):
把cdn.tungchiahui.cn也和alist.tungchiahui.cn同源,然后在腾讯云edgeone里加速,在规则引擎里新加一个cdn路径前缀增加的规则。
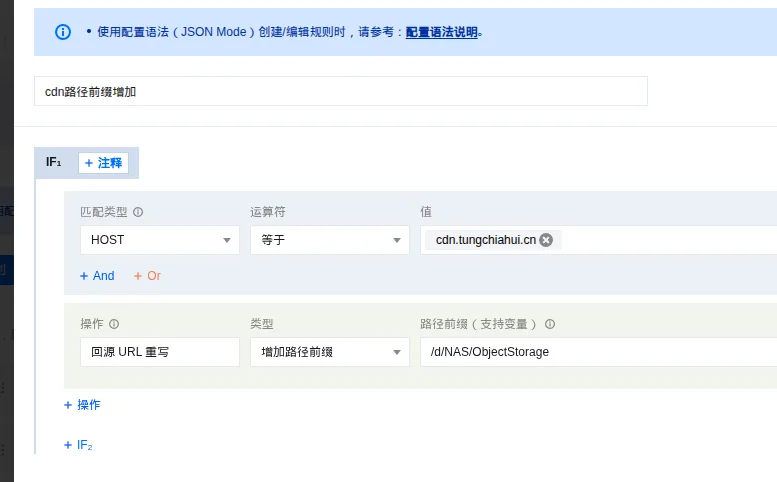
- HOST选择
cdn.tungchiahui.cn - 操作选
回源URL重写 - 类型选
增加路径前缀 - 增加路径前缀选
/d/AList文件的多余路径/
比如增加路径前缀我填的/d/NAS/ObjectStorage,
那么我用https://cdn.tungchiahui.cn/tungwebsite/assets/images/2024/03/30/1787159371048-e2e3749f.webp
将会同等于https://alist.tungchiahui.cn/d/NAS/ObjectStorage/tungwebsite/assets/images/2024/03/30/1787159371048-e2e3749f.webp,
都会回源到我的https://服务器ip地址/d/NAS/ObjectStorage/tungwebsite/assets/images/2024/03/30/1787159371048-e2e3749f.webp。
再设置一个缓存规则:

缓存规则可以这样理解:
-
节点缓存 TTL:30 天
EdgeOne 会把图片缓存到边缘节点 30 天。后续访问优先从 CDN 节点返回,可以明显减少 AList、服务器 和 服务器宽带 的压力。 -
强制缓存:关闭
保持关闭更稳妥。如果源站明确要求某些资源不要缓存,EdgeOne 会尊重源站设置,避免把特殊资源错误缓存。 -
Cache Key:查询字符串全部忽略
例如:xxx.webp xxx.webp?a=1 xxx.webp?a=2 xxx.webp?a=3都会被认为是同一个缓存资源。这样可以防止别人不断修改 URL 参数绕过缓存,反复回源打你的 AList 和 服务器,而我这里文件还存储在NAS上,也会进一步防止他反复打我的NAS。
-
忽略大小写:关闭
abc.webp和ABC.webp会被当成两个不同文件,避免不同文件被错误合并到同一个缓存。 -
PHP / JSP / ASP / ASPX:不缓存
这些通常属于动态页面,单独设为不缓存可以防止动态内容被 CDN 长时间缓存。对于纯图片 CDN 来说基本属于防呆设置。 -
图片浏览器缓存 TTL:1 天
jpg、png、gif、bmp、svg、webp等图片会在用户浏览器中缓存 1 天。用户短时间内重复访问时,浏览器可以直接读取本地缓存,连 EdgeOne 都不用重新请求。
最终缓存链路大致如下:
浏览器
  ↓ 本地缓存 1 天
EdgeOne
  ↓ 节点缓存 30 天
AList
  ↓
NAS
绝大多数重复访问会停在浏览器或 EdgeOne,不会真正回源到家里的 服务器 和 NAS。
11.MinIO 自建对象存储
11.1.简介
| 项目 | 腾讯 COS | 自建 MinIO |
|---|---|---|
| 对象存储 | ✅ | ✅ |
| S3 API | ✅ | ✅ |
| 图片/附件 | ✅ | ✅ |
| Bucket | ✅ | ✅ |
| SDK 上传 | ✅ | ✅ |
| 私有对象/签名 URL | ✅ | ✅ |
| Versioning | ✅ | ✅ |
| 存储空间 | 腾讯提供 | 吃你服务器硬盘 |
| 带宽 | 腾讯提供 | 吃学校服务器出口带宽 |
| 高可用 | 腾讯负责 | 你负责 |
| 数据冗余 | 腾讯负责 | 你负责 |
| 硬盘损坏 | 云厂商处理 | 可能直接丢数据 |
| 运维 | 几乎没有 | Docker、磁盘、备份、升级、安全都自己搞 |
| 费用 | 存储+流量 | 软件可以自建,但硬盘/服务器/带宽自己承担 |
| CDN | 很容易接腾讯 CDN/EO | MinIO 本身不是 CDN |
| 可控性 | 一般 | 非常高 |
11.2.安装
首先你需要服务器上安装一个1panel.
进入商店,搜索minio.
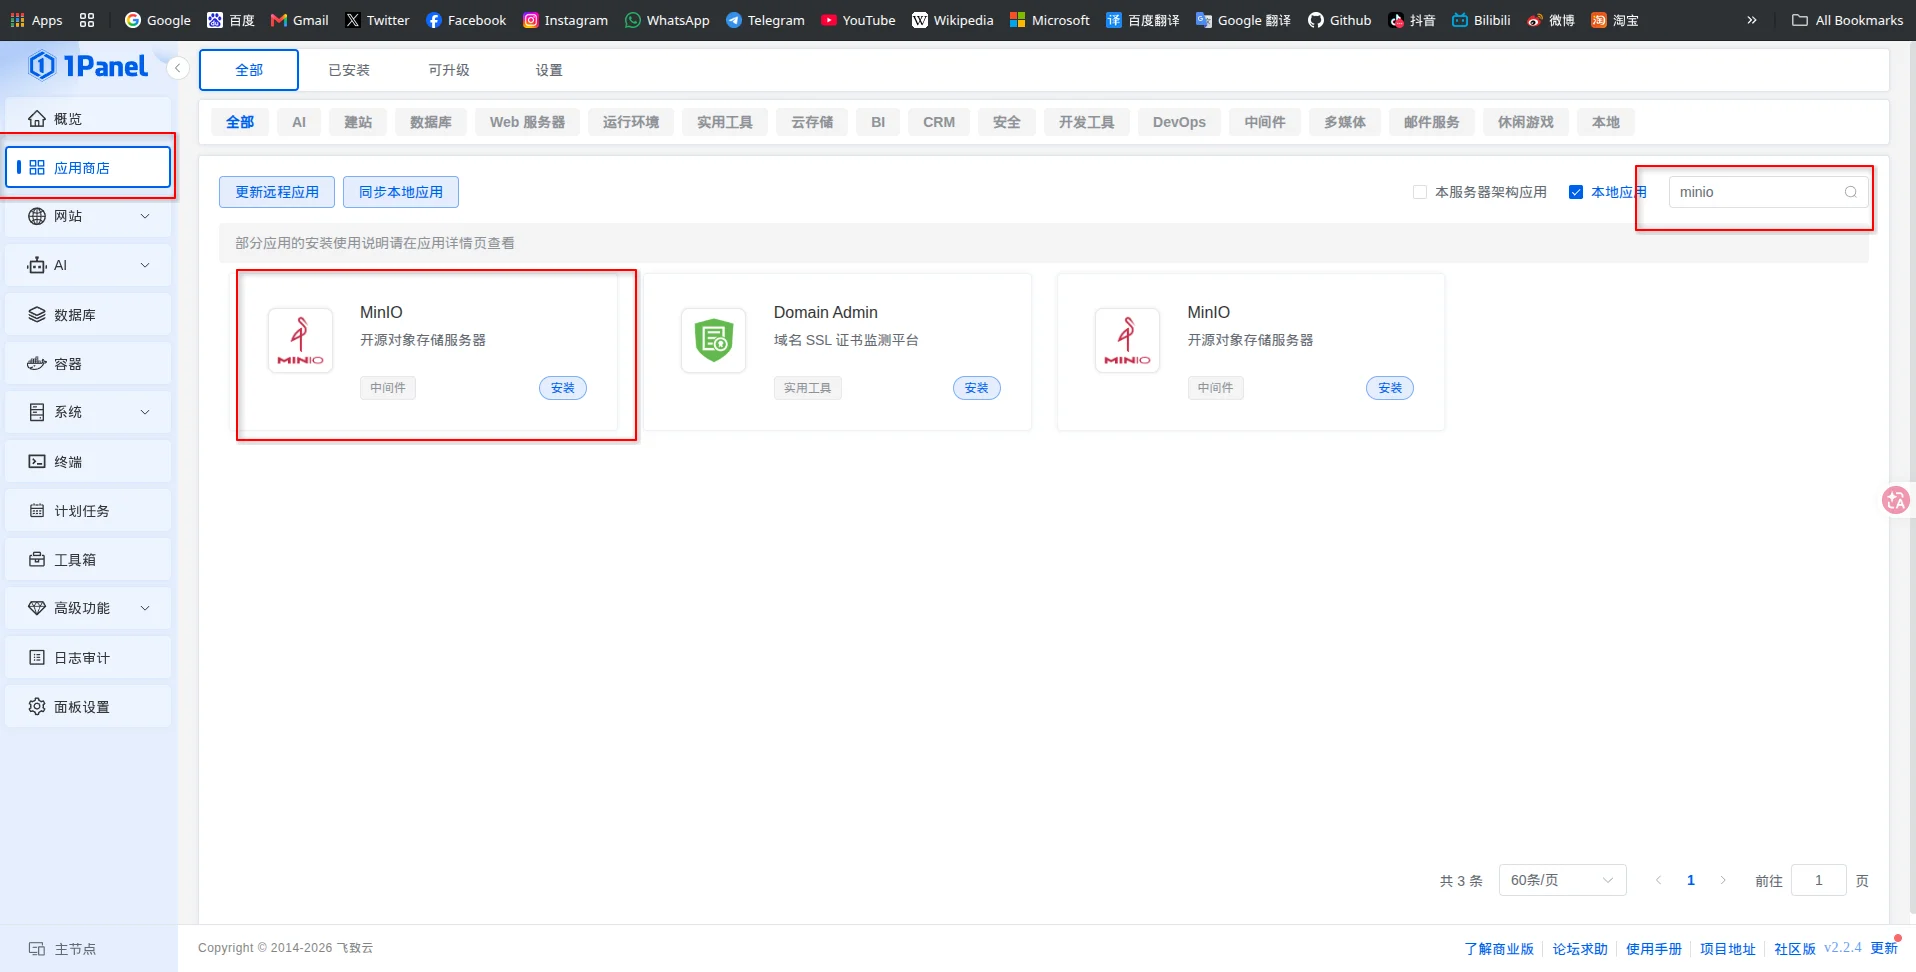
点击安装.
大多数设置都默认即可,但账号密码要自己填写,这个端口外部访问这里,如果你的服务器在内网,可以选择打开,如果你的服务器的IP是一个公网IP,那么不建议你打开.
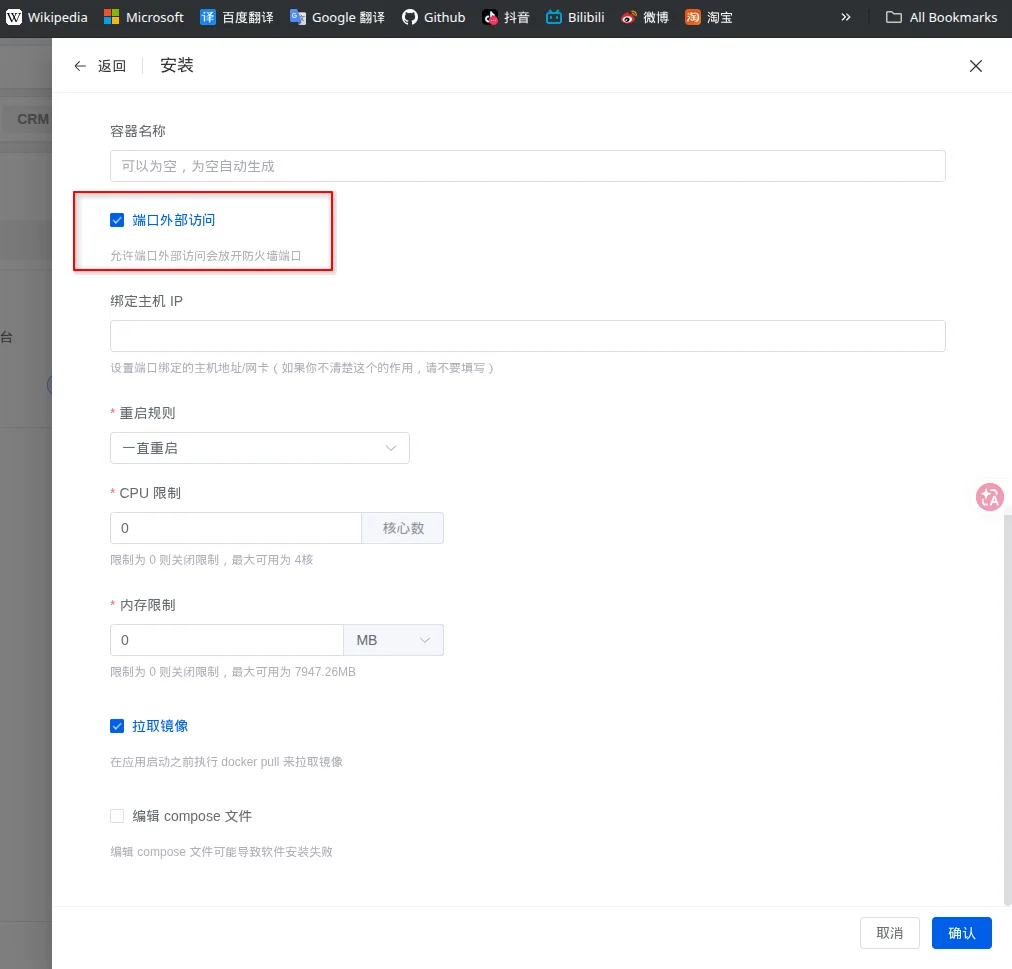
| 配置项 | 建议 |
|---|---|
| 名称 | minio |
| 版本 | 选 1Panel 当前提供的稳定版本 |
| 用户 | 自己设一个,不要用太简单的 |
| 密码 | 自己设一个密码复杂点的 |
| WebUI 端口 | 9001 |
| S3 API 端口 | 9000 |
| 会话持续时间 | 默认 12h 即可 |
| 启用 WebUI | 开 |
| WebUI 动画 | 随意 |
| 端口外部访问 | 建议不开公网暴露,但如果测试的话,先开公网暴露也可以. |
最后点击安装.
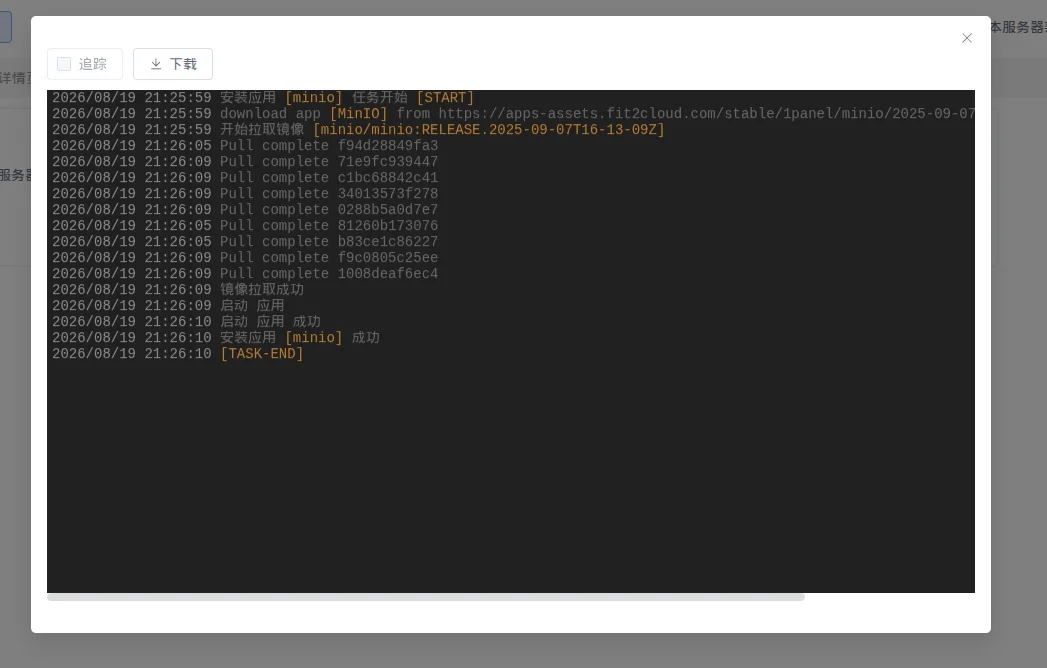
11.3.配置MinIO
11.3.1.登陆MinIO
在浏览器输入服务器ip:9001:
比如我这个内网10.0.0.4:9001
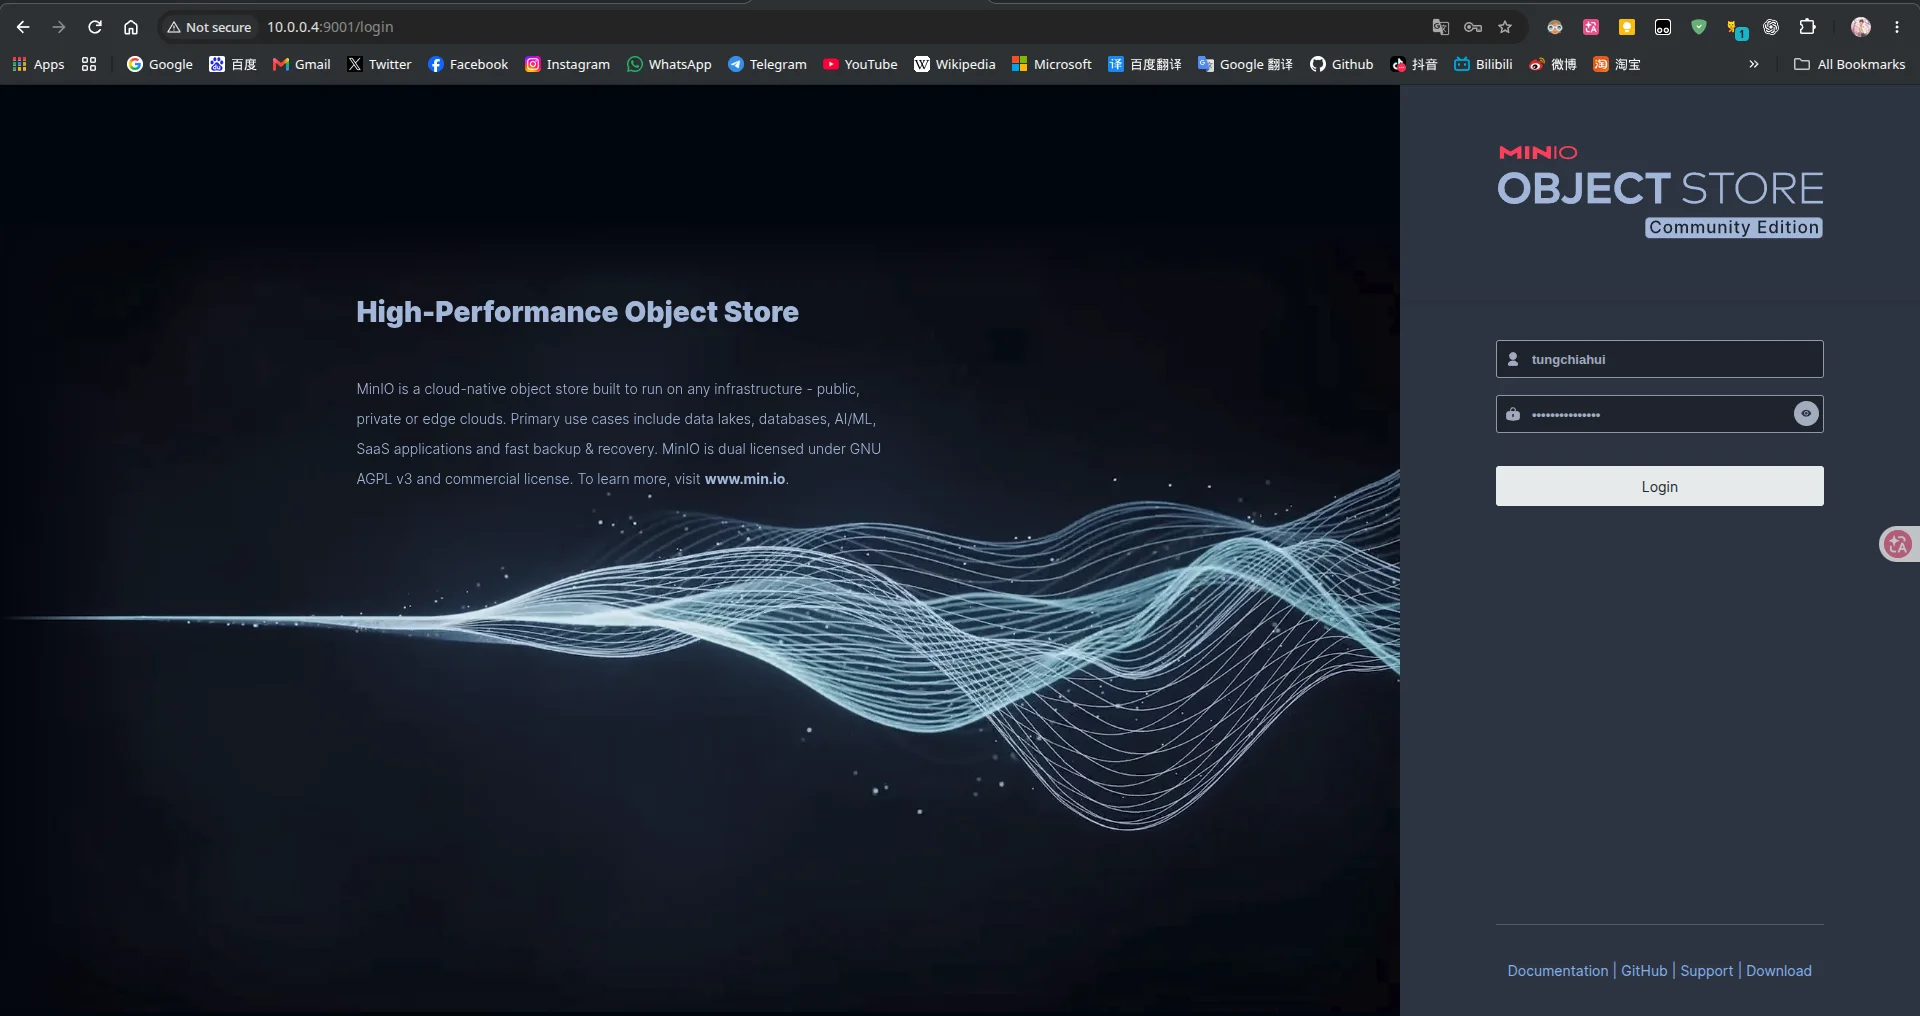
然后登陆账号密码.
11.3.2.测试桶
创建一个桶,比如我这里叫test

再随便上传一张图片试试.
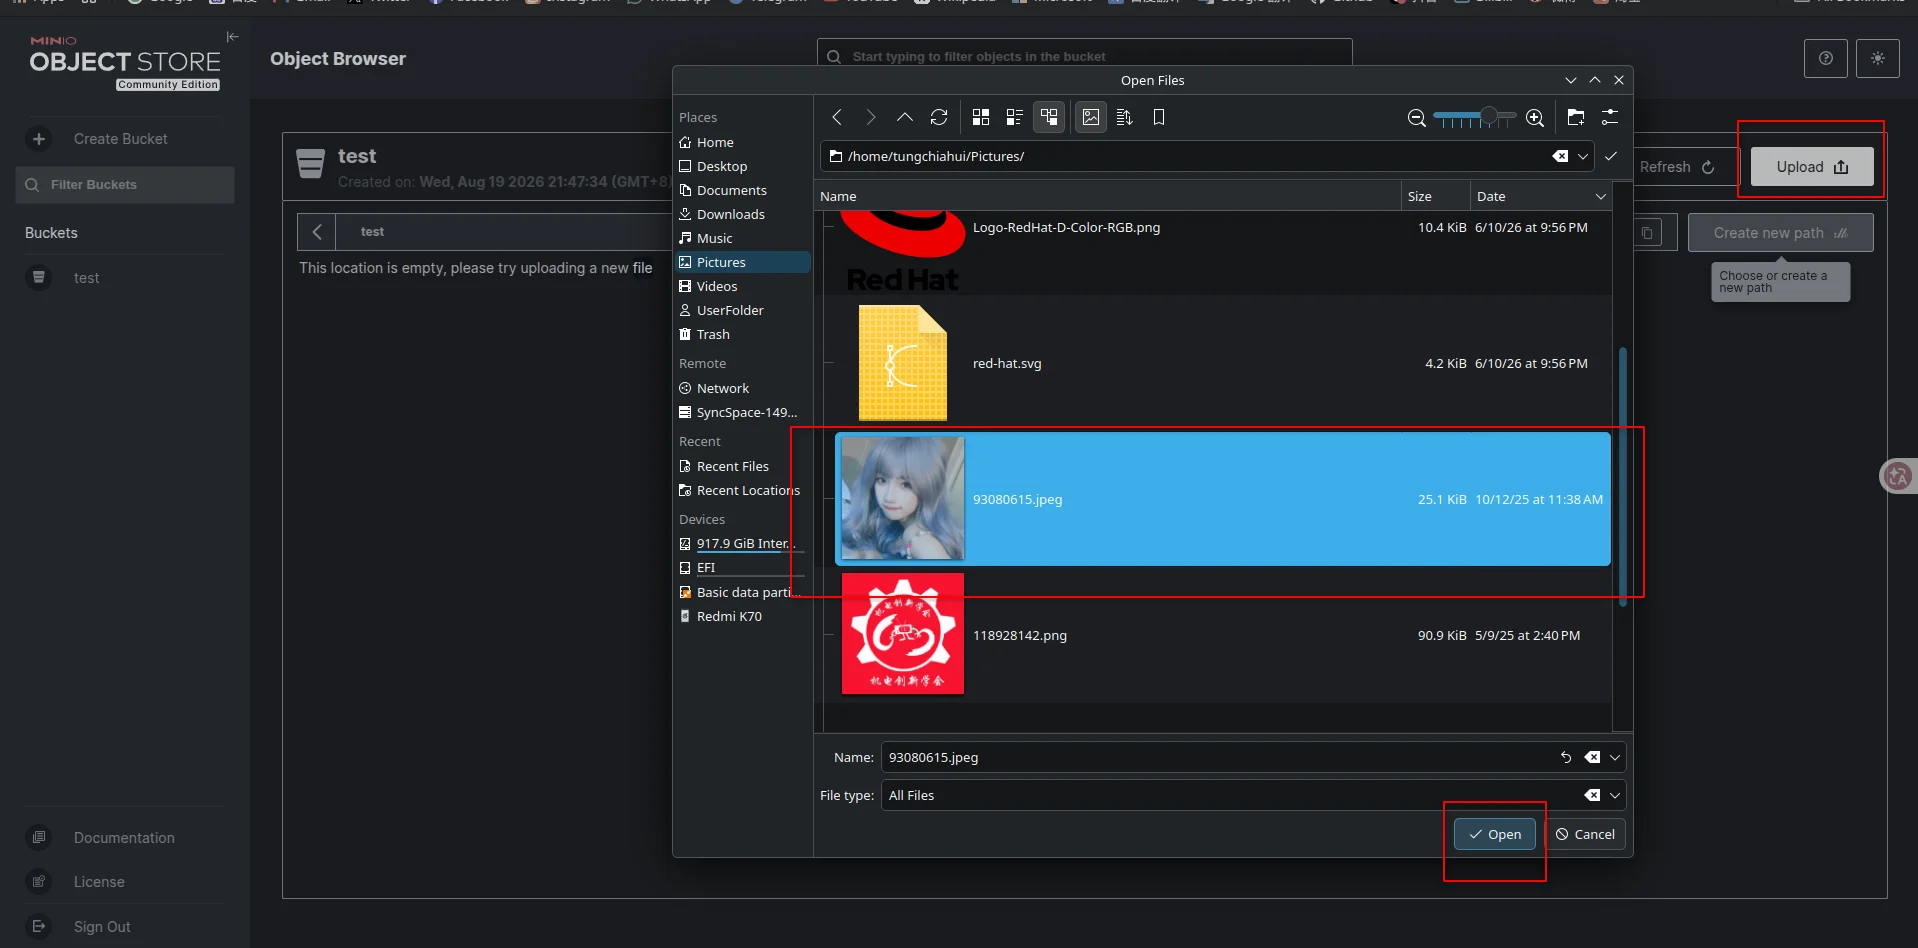
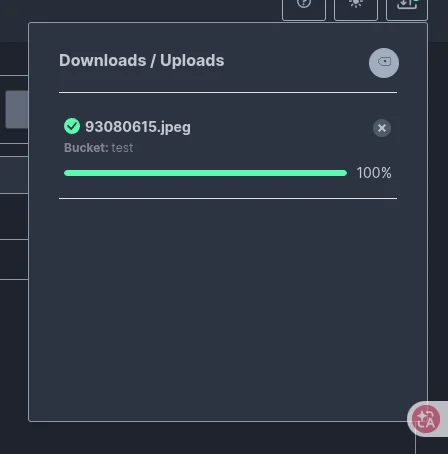
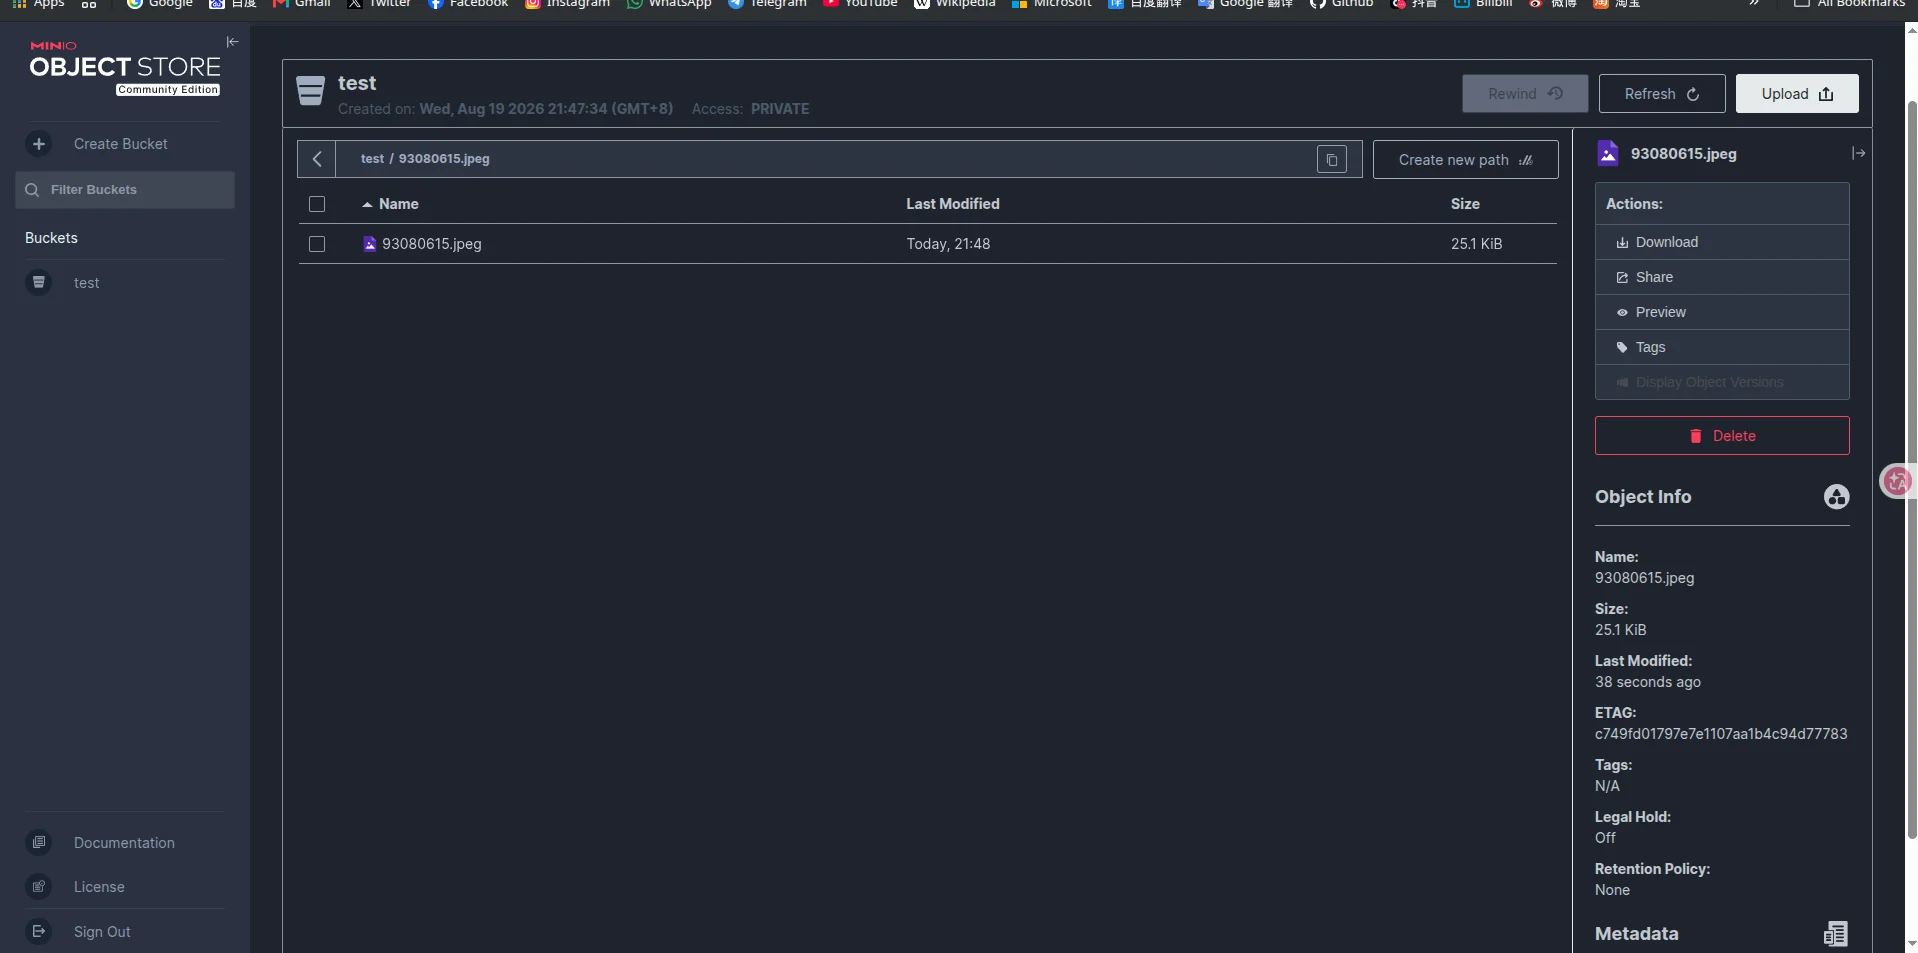
11.3.3.测试S3协议
S3协议的网址应该是服务器ip:9000:
比如我这个内网10.0.0.4:9000
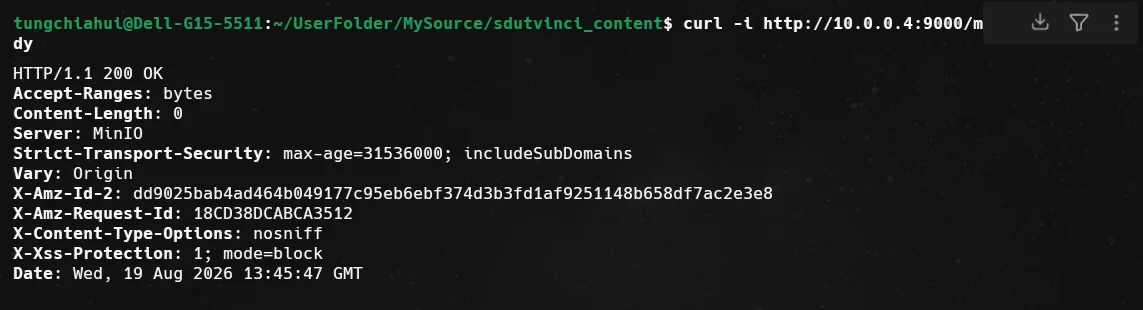
在你电脑上测试 S3 API 健康状态:
curl -i http://10.0.0.4:9000/minio/health/live如果显示HTTP/1.1 200 OK,那证明是OK的。
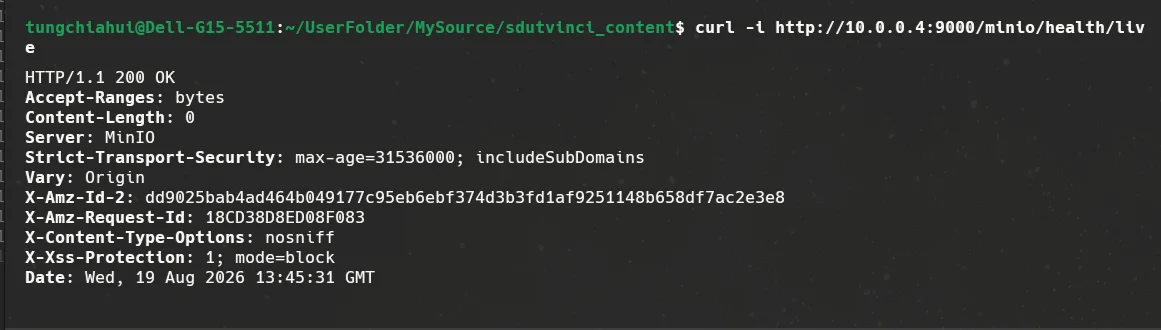
同样,测试下面这个是否S3就绪:
curl -i http://10.0.0.4:9000/minio/health/ready如果显示HTTP/1.1 200 OK,那证明是OK的。
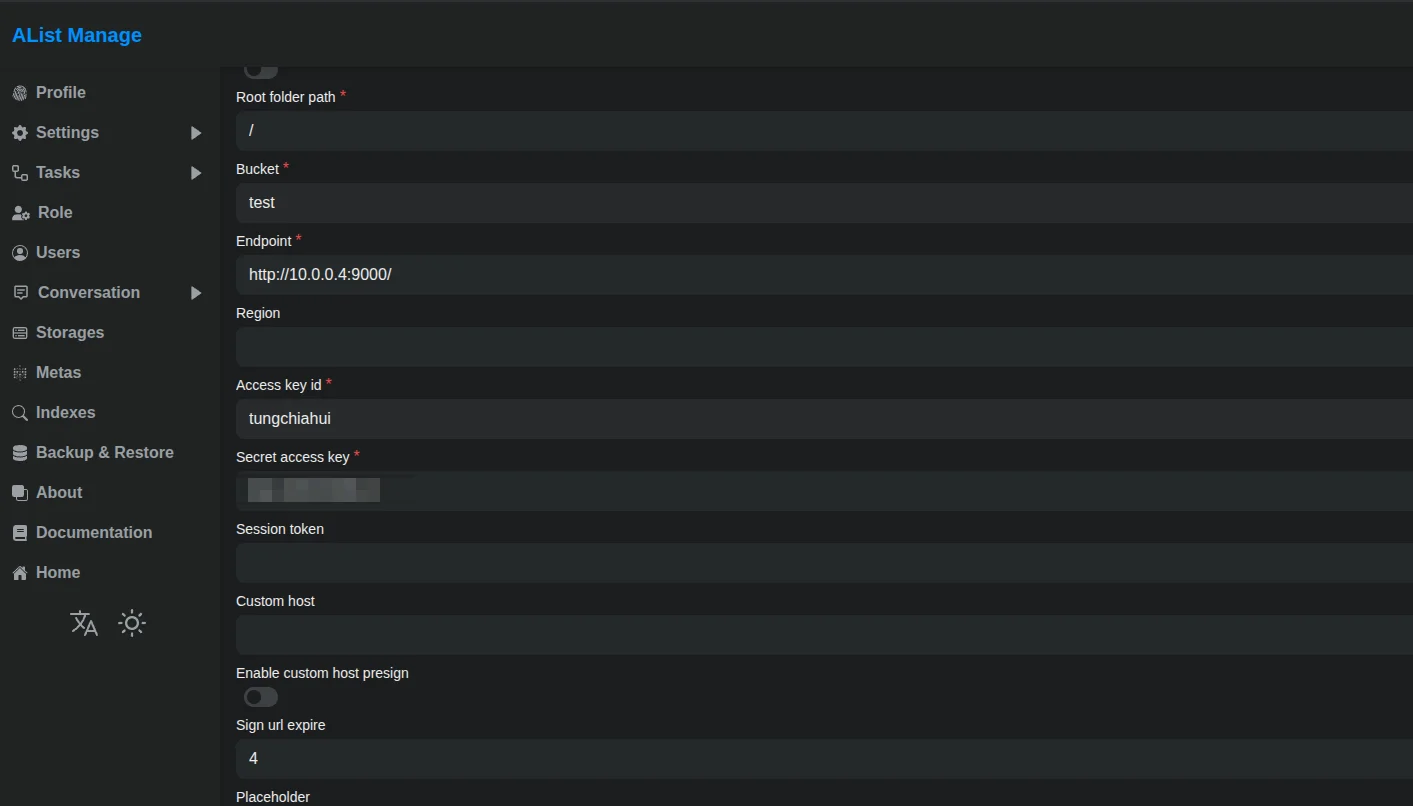
11.3.4.接入AList测试

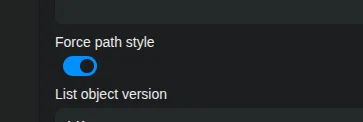
这个一定要开着。
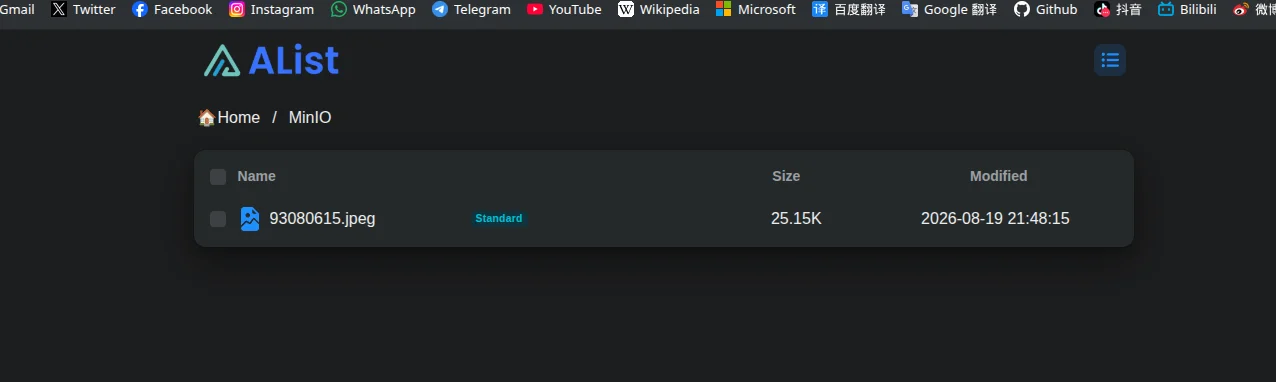
配置完后,可以返回文件列表,发现刚才的文件可以被正常查看了。